


7
(continued)
2009 Electrolux Home Products, Inc. All rights reserved.
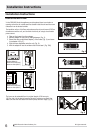
Installation in a double-hung sash window
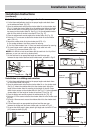
Installation in a sliding sash window
Fig. 10
Foam seal A
(adhesive type)
Fig. 16
Foam seal
(adhesive type)
Installation Instructions
Installation Instructions
Fig. 19
Foam seal
Fig. 11
Window slider kit
Window stool
screws
Fig. 20
Fig. 12
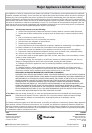
Cut this side to fit your window
Fig. 14
Fig. 15
Foam seal
Fig. 13
Window slider kit
Window stool
screws
Fig. 17
Window stool
Window slider kit
Fig. 18
Window stool
Window slider kit
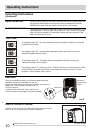
3. Close the window sash securely against the window slider kit. (Fig. 13)
7. Cut the foam seal to an appropriate length and seal the open gap
between the top window sash and outer window sash, as shown in Fig.15.
2. Open the window sash and place the window slider kit on the window stool
(Fig. 11). Attach the window slider kit to the window stool. Adjust the length
of the window slider kit according to the width of window. Screw down the
two screws on the window slider kit. See Fig.11. Cut the adjustable window
slider kit if the width of window is less than 67.5cm (Fig. 12).
1. Cut the foam seals(adhesive type) to the proper lengths and attach them
to the window and stool. (Fig. 10)
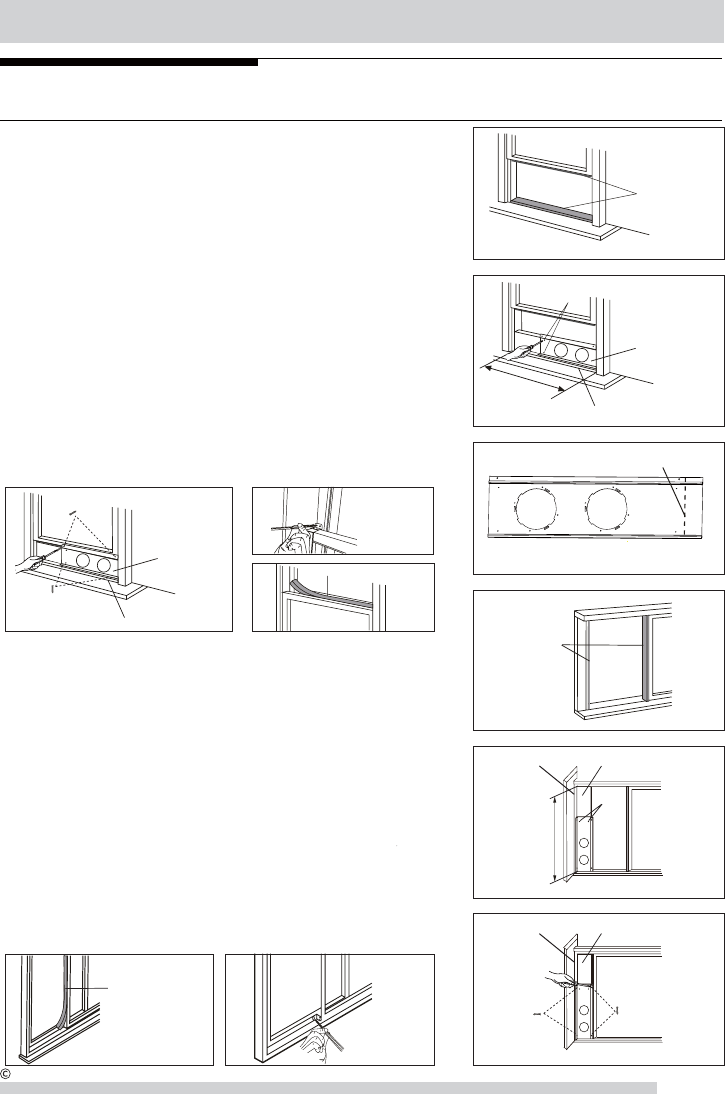
3. Close the sliding sash securely against the window slider kit. (Fig. 18)
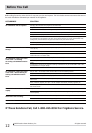
1. Cut the foam seals(adhesive type) to the proper lengths and attach them
to the window frame. See Fig.16.
2. Open the window sash and place the window slider kit on the window stool.
See Fig.17. Attach the window slider kit to the window stool. Adjust the
length of the window slider kit according to the height of window. Screw
down the two screws on the window slider kit. See Fig.17. Cut the adjustable
window slider kit if the height of window is less than 67.5cm (Fig. 12).
6. Cut the foam seal to an appropriate length and seal the open gap
between the sliding sash and outer window sash, as shown in Fig.19.
67.5cm~123cm
67.5cm~123cm
4. Drive two 12.7 mm screws to secure the window slider kit to the window
sash.
(FIG. 13)
6.
To secure lower sash in place, attach right angle sash lock with
PPƎVFUHZDVVKRZQ),*
NOTE: It is difficult to lock the windows with the sash lock for Vinyl-Clad
windows, so you can use lock by window itself.
7. To secure the sliding sash in place, attach right angle sash lock with 12.7mm
(1/2") screw as shown.(Fig.20)
5. Secure the window slider kit to the window stool
(FIG. 13)
:
A: For wooden windows: Use 19mm screws for securing.
B: For Vinyl-Clad windows: Use
12.7mm hex head cap screws
for securing.
4. Drive two 12.7mm screws to secure the window slider kit to the window sash.
(Fig. 18)
5. Drive two 19mm screws to secure the window slider kit to the window stool.
(Fig. 18)
19mm screws or 12.7mm
hex head cap screws
12.7mm screws
19mm screws
12.7mm screws