


www.fmiproducts.com
109493-01R 11
VENTING INSTALLATION
Continued
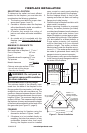
Combustible materials, such as wallboard,
gypsum board, sheet rock, drywall, plywood,
etc. may make direct contact with sides and
top around the replace face. It is important
that combustible materials do not overlap the
face itself. Brick, glass, tile or other noncom-
bustible materials may overlap the front face
provided they do not obstruct essential open-
ings like louvered slots or any other opening.
When overlapping with a noncombustible
facing material, use only noncombustible
mortar or adhesive.
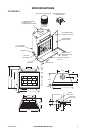
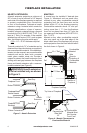
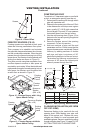
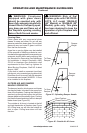
10'
2' Min.
10'
3' Min.
2' Min.
3' Min.
Level of
Flue Gas
Outlet
Figure 17 - 10 Foot Rule
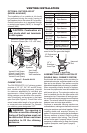
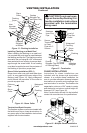
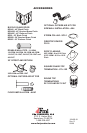
Figure 18 - Gas Line Knockout
Side
Firebrick
Finished
Side
Refractory
Knockout
Plug
Outside of
Fireplace
Gas Line
Conduit
Insulation
Gas
Conduit
Cover
1/2" Dowel
Remove
Knockout
All ue gas outlet chimney terminations must
extend a minimum of 3 feet in height above the
highest point where it passes through the roof
and must be at least 2 feet above the high-
est point of the roof that is within a horizontal
distance of 10 feet (see Figure 17).
Gas line hook up should be done by your
supplier or a qualied service person.
Note: Before you proceed, make sure your
gas supply is turned off.
Use only a 1/2" black iron pipe and appropri-
ate ttings.
1. Remove knockout indentation on refrac-
tory or rebrick wall located above refrac-
tory hearth oor. The knockout indentation
must be rmly tapped with any solid object
such as a 1/2" dowel until it is released.
Remove fragmented portions of refractory
(see Figure 18).
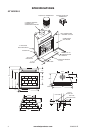
2. Remove gas line cover plate located on
either side of replace and pull out insu-
lation from gas line conduit sleeve. Save
insulation for reuse. Replace screws.
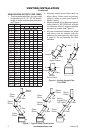
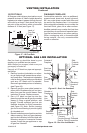
3. Run a 1/2" black iron gas line into re-
place through the rear at gas line conduit
sleeve (if using a raised platform, add
height). Provide sufcient gas line into
replace chamber for tting connection
(see Figure 19). Note: Secure incoming
gas line to wood framing to provide rigidity
for threaded end.
4. Repack insulation around gas line and into
sleeve opening. Seal any gaps between
gas line and refractory knockout hole with
refractory cement or commercial furnace
cement, Install the gas appliance or cap
off gas line if desired.
Seal
Opening
with
Refractory
Cement
Outside of
Fireplace
Gas
Line
Conduit
Repack
Insulation
Incoming
1/2" Black
Iron Pipe
Side
Firebrick
Finished
Side
Provide Enough Threaded
End for Fitting Connection
Figure 19 - Gas Line Installation
OPTIONAL GAS LINE INSTALLATION