


www.fmiproducts.com
105163-01E 11
INSTALLATION
Continued
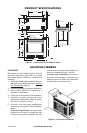
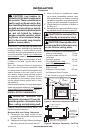
1
1
/
2
" Max.
3/8" Max.
4"
8" Min. from adjacent
wall to fireplace opening
SAFE
ZONE
Combustible material must
not overlap more than 3/8"
onto black metal front face.
Nailing Flange
Drywall
Figure 9 - Framing for Built-In Firebox
Installation, Top View
Min. from rebox
edge to combustible
material
Edge
of side
rebox
opening
3. If a raised platform is to be constructed,
ceiling clearances must be maintained.
4. Install gas piping to rebox location. See
Installing Gas Line and Connecting to Gas
Supply in log set owner’s manual.
5. Carefully set rebox in front of rough
opening.
6.
Carefully insert rebox into rough opening.
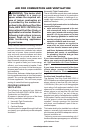
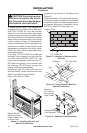
7. Attach rebox to wall studs using nails
or wood screws through holes in nailing
ange (see Figure 10). Attach rebox to
board base through holes in rebox bot-
tom (see Figure 10).
IMPORTANT: When nishing your rebox,
combustible materials such as wall board,
gypsum board, sheet rock, drywall, plywood,
etc. may be butted up next to the sides and
top of the firebox. Combustible materials
should never overlap the rebox front facing
more than 3/8".
WARNING: Do not allow any
combustible materials to over-
lap the rebox front facing (see
Figure 9).
IMPORTANT: Noncombustible materials such
as brick, tile, etc. may overlap the front facing,
but should never cover any necessary open-
ings like louvered slots.
WARNING: Never modify or
cover the louvered slots on the
front of the rebox.
WARNING: Use only non-
combustible mortar or adhe-
sives when overlapping the front
facing with noncombustible
facing material.
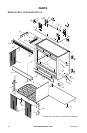
Figure 10 - Attaching Firebox to Wall Studs
Nailing
Flanges
Nails or
Wood
Screws
INSTALLING GAS LINE
WARNING: A qualied ser-
vice person must connect heater
to gas supply. Follow all local
codes.
IMPORTANT: See Connecting to Gas Supply
in your log set owner’s manual for details on
gas hookup.
Figure 11, page 12, shows the typical in-
stallation for the gas line. When you have
determined how the gas line will run, locate
one of the recessed knockouts in the re-
brick oor (see Figure 12, page 12,). Firmly
tap the center of the knockout with a chisel
until it is released. Carefully chisel the rough
edges of the hole you have made to smooth
edges. This hole will line up with the hole in
the metal oor.
Nails or Wood
Screws