www.fmiproducts.com
122280-01E 15
VENTING INSTALLATION
Continued
Pitch Slope Opening
Used Flashing
Model No.
Flat 0° 15" V6F-8DM
0-6/12 26.6° 16
1
/
8
" V6F-8DM
6/12- 12/12 45.0° 20
3
/
8
" V12F-8DM
FLASHING INSTALLATION (V6F-8DM
OR V12F-8DM)
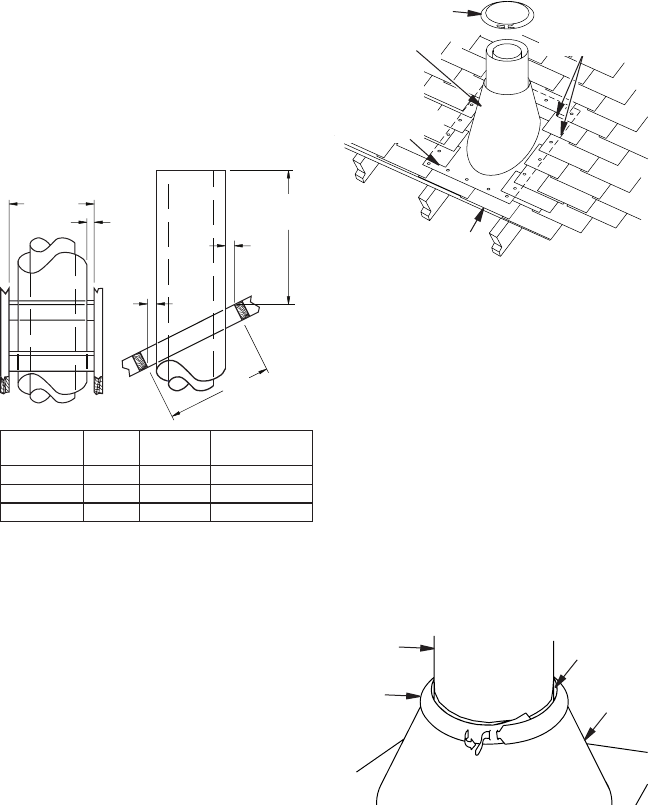
Determine ashing to be used with roof open-
ing chart. Slide ashing over pipe until base is
at against roof. Replace as many shingles as
needed to cover exposed area and ashing
base. Secure in position by nailing through
shingles (see Figure 17). DO NOT NAIL
THROUGH FLASHING CONE.
Figure 16 - Roof Opening Measurements
PENETRATING ROOF
To maintain a 1" clearance to pipe on a roof
with a pitch, a rectangular opening must
be cut.
1. Determine center point where pipe will
penetrate roof.
2. Determine center point of roof. Pitch is
the distance the roof drops over a given
span, usually 12". A 6/12 pitch means that
the roof drops 6" for each 12" measure
horizontally down from roof rafters.
3. Use roof opening chart (Figure 16) to
determine correct opening length and
ashing required.
4. Remove shingles around opening mea-
sured. Cut out this section.
14
3
/
8
"
(36.5 cm)
30"
(76.2 cm)
1"
(2.5
cm)
1"
(2.5
cm)
Minimum Measurements
1"
(2.5 cm)
Opening "A"
Nail Only
Outer
Perimeter
of Flashing
Storm Collar
Flashing
Cone
Underlap Shingles
at Bottom
Overlap
Shingles Top
and Sides Only
Figure 17 - Flashing Installation
Installing Flashing on a Metal Roof
When installing ashing on a metal roof, it
is required that putty tape be used between
ashing and roof. Flashing must be secured
to roof using #8 x 3/4" screws and then sealed
with roof coating to prevent leakage through
screw holes. A roof coating must also be ap-
plied around perimeter of ashing to provide
a proper seal.
Place storm collar over pipe and slide down
until it is snug against open edge of ashing
(see Figure 18). Use SC1 for all round ter-
minations and SC2 for all terminations with
slip sections. Apply waterproof caulk around
perimeter of collar to provide a proper seal.
Figure 18 - Storm Collar
Chimney
Pipe
Waterproof
Caulk
Storm
Collar
Flashing


