


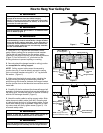
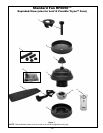


Collar
4
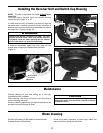
Electrical and Structural Requirements
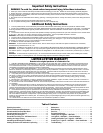
Ceiling
Ceiling
Joists
2˝ x 4˝
Outlet
Box
Figure 1
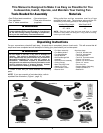
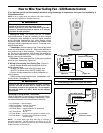
How to Assemble Your Down Rod Sleeve
Collar (2)
Sleeve, 8˝
Checkring
Figure 1
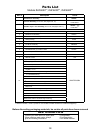
1. Prior to assembly, set aside and save the hardware
bag(s) packed in the packing.
2. Check to see that you have received the following parts
(Figure 1).
Figure 2
▲
WARNING
To avoid fire or shock, follow all wiring instructions
carefully. Any electrical work not described in these
instructions should be done or approved by a licensed
electrician.
If your fan is to replace an existing light fixture, turn
electricity off at the main fuse box at this time and remove
the existing light fixture.
▲
WARNING
Turning off wall switch is not sufficient. To avoid
possible electrical shock, be sure electricity is turned
off at the main fuse box before wiring. All wiring must
be in accordance with National and Local codes and the
ceiling fan must be properly grounded as a precaution
against possible electrical shock.
▲
WARNING
To reduce the risk of fire, electrical shock, or personal
injury, mount fan to outlet box marked acceptable
for fan support of 22.7 kg (50 lbs) or less. Use screws
supplied with outlet box. Most outlet boxes commonly
used for support of light fixtures are not acceptable for
fan support and may need to be replaced. Consult a
qualified electrician if in doubt.
Your new ceiling fan will require a grounded electrical
supply line of 120 volts AC, 60 Hz, 15 amp circuit. The
outlet box must be securely anchored and capable of
withstanding a load of at least 22.7 kgs (50 lbs). Figure 1
depicts different structural configurations that may be used
for mounting the outlet box.
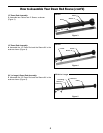
Sleeve, 4˝
DR1x6
6˝ Down Rod Assembly:
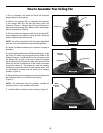
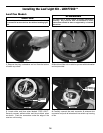
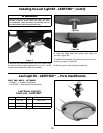
3. Assemble one Collar with allen wrench provided, as
shown (Figure 2).
NOTE: You will be using either the 6˝ downrod supplied with
your fan or an optional downrod purchased separately.
INSTALLATION NOTE
For various Downrod lengths, maintain the distance
between 2½ to 3½ from the bottom of Collar to the end of
Downrod as shown.
2½˝