


2322
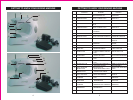
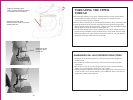
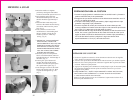
CAMBIO DE LA AGUJA
1. Levante la aguja hasta su posición más elevada.
2. Sostenga la aguja y afloje el tornillo del sujetador que la sostiene, luego
extraiga la aguja vieja.
3. Inserte la nueva aguja dentro del sujetador con el lado plano de la misma
orientado hacia la parte trasera de la máquina, asegurándose que el ojo de
la aguja quede en línea recta orientado hacia el frente de la máquina.
Asegúrese de empujar la aguja hacia arriba hasta que haga tope en la
barra porta agujas, antes de ajustar el tornillo del sujetador.
4. Ajuste el tornillo del sujetador de la aguja.
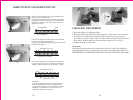
Sírvase notar que: Una vez reemplazada la aguja, deberá primero mover la
rueda de la máquina a mano, con el objeto de verificar si se generan buenas
puntadas,SOLAMENTE CUANDO LA AGUJA SE ENCUENTRE EN LA
POSICIÓN CORRECTA Y SE FORMEN BUENAS PUNTADAS, VERIFICADAS
MEDIANTE EL USO DE LA RUEDA DE MANO, se podrá luego operar la
máquina eléctricamente.
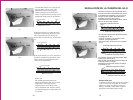
CHANGEMENT DE L’AIGUILLE
1. Soulevez l’aiguille à sa position la plus élevée.
2. Tenez l’aiguille et desserrez la vis du pince-aiguille. Retirez ensuite l’aiguille
défectueuse
3. Insérez la nouvelle aiguille dans le pince-aiguille, côté plat faisant face à l’arrière
de la machine, en vous assurant que le chas de l’aiguille fait face à l’avant de la
machine. Assurez-vous de bien pousser l’aiguille dans la barre d’aiguille avant de
resserrer la vis du pince-aiguille.
4. Serrez la vis du pince-aiguille.
Remarque : après avoir remplacé l’aiguille, commencez par activer la machine à
l’aide du volant de manœuvre pour voir si les coutures se font bien. Utilisez ensuite
la pédale ou le commutateur pour mettre en marche la machine, EN VOUS
ASSURANT D’ABORD QUE L’AIGUILLE EST EN POSITION ET QUE LA
VÉRIFICATOIN AVEC LE VOLANT DE MANŒUVRE VOUS A PERMIS DE
VOIR QUE LES COUTURES SE FONT CORRECTEMENT.
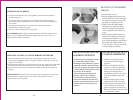
POSSIBILITY TO CAUSE A POOR STITCH
1. The upper thread is not threaded correctly.
2. The presser foot is not in the down position.
3. The needle is not inserted correctly in the needle bar.
4. The flat side of the needle is not inserted toward the back of the machine
and the eye of the needle is not facing the front of the machine.
5. The needle is bent.
6. Lower threading is incorrect.
7. The wrong bobbin is being use in the bobbin case.
8. Upper tension is too loose.
9. The bobbin case is not in the right position, which should prevent any
counterclockwise movement.
C
opyright © 2002 EURO-PRO Operating LLC All rights reserved
POSIBILIDADES QUE CAUSAN PUNTADAS POBRES
1. El enhebrado superior no está correcto.
2. El pie prensatelas no se encuentra en su posición de apoyo.
3. La aguja no se encuentra completamente insertada en la barra porta agujas.
4. El ojo de la aguja no esta orientado hacia el frente de la máquina.
5. La aguja está doblada.
6. El enhebrado inferior no está correcto.
7. Se ha usado una medida incorrecta de bobina inferior.
8. El enhebrado superior está demasiado flojo.
9. El portabobinas no se encuentra en la posición correcta, donde el
portabobinas queda trabado por el movimiento antihorario.
Copyright © 2002
EURO-PRO Operating LLC All rights reserved