


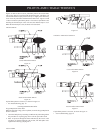


Page 2116937-4-0806
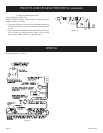
IMPORTANT: Operating heater where impurities in air exist may create odors. Cleaning supplies, paint, paint remover, cigarette smoke, cements and
glues, new carpet or textiles, etc., create fumes. These fumes may mix with combustion air and create odors.
1. When ignitor button is pressed, there is no spark at ODS/pilot.
a. Ignitor electrode positioned wrong - Replace ignitor.
b. Ignitor electrode broken - Replace ignitor.
c. Ignitor electrode not connected to ignitor cable - Reconnect ignitor
cable.
d. Ignitor cable pinched or wet - Free ignitor cable if pinched by
any metal or tubing. Keep ignitor cable dry.
e. Broken ignitor cable - Replace ignitor cable.
f. Bad piezo ignitor - Replace piezo ignitor.
2. When ignitor button is pressed, there is spark at ODS/pilot, but no
ignition.
a. Gas supply turned off or manual shutoff valve closed - Turn on
gas supply or open manual shutoff valve.
b. Control knob not in PILOT position - Turn gas control knob to
PILOT position.
c. Control knob not pressed in while in PILOT position - Press in
control knob while in PILOT position.
d. Air in gas lines when installed - Continue holding down control
knob. Repeat igniting operation until air is removed.
e. Depleted gas supply - Contact local gas company.
f. ODS/pilot is clogged - Clean ODS/pilot or replace ODS/pilot
assembly.
g. Gas regulator setting is not correct - Replace gas regulator.
3. ODS/pilot lights but flame goes out when control knob is released.
a. Control knob not fully pressed in - Press in control knob fully.
b. Control knob not pressed in long enough - After ODS/pilot lights,
keep control knob pressed in 30 seconds.
c. Safety interlock system has been triggered (thermostat models
only) - Wait one minute for safety interlock system to reset. Repeat
ignition operation.
d. Manual Shutoff valve not fully open - Fully open manual shutoff
valve.
e. Thermocouple connection loose at control valve - Hand tighten
until snug, then tighten 1/4 turn more.
f. Pilot flame not touching thermocouple, which allows thermocouple
to cool, causing pilot flame to go out. This problem could be caused
by either 1) low gas pressure - Contact local gas company or 2)
dirty or partially clogged ODS/pilot - Clean ODS/pilot or replace
ODS/pilot assembly.
g. Thermocouple damaged - Replace thermocouple.
h. Control valve damaged - Replace control valve.
4. Main burner does not light after ODS/pilot is lit.
a. Main burner orifice clogged - Clean main burner or replace main
burner orifice.
b. Main burner orifice diameter is too small - Replace main burner
orifice.
c. Inlet gas pressure is too low - Contact local gas company.
5. Pilot burning, no gas to burner, valve knob "ON", on/off switch
"ON."
a. "On/Off" switch, wall switch, remote control or wires defective
- Check "on/off" switch and wires for proper connections. Place
jumper wires across terminal at switch - if burner comes on, replace
defective switch. If OK, place jumper wires across switch wires
at gas valve-if burner comes on, wires are faulty or connections
are bad.
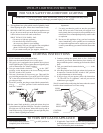
b. Thermopile may not be generating sufficient millivolts - If the
pilot flame is not close enough physically to the thermopile, clean
the ODS/pilot.
- Be sure the wire connections from the thermopile at the gas
valve terminals are tight and the thermopile is fully inserted into
the pilot bracket.
- Check the thermopile with a millivolt meter. Take the reading
at TH-TP & TP terminals of the gas valve. The meter should read
350 millivolts minimum, while holding the valve knob depressed
in the
PILOT position, with the pilot lit, and the ON/OFF switch
in the OFF position. Replace the faulty thermopile if the reading
is below the specified minimum.
- With the pilot in the ON position, disconnect the thermopile
leads from the valve. Take a reading at the thermopile leads. The
reading should be 350 millivolts minimum. Replace the thermopile
if the reading is below the minimum.
c. Defective valve - Turn valve knob to "ON." Place ON/OFF switch
to "ON." Check with millivolt meter at thermopile terminals.
Millivolt meter should read greater than 200 millivolts. If the
reading is okay and the main burner does not ignite, replace the
gas valve
d. Plugged main burner orifice - Check main burner orifice for
blockage and remove.
6. Delayed ignition of main burner.
a. Manifold pressure is too low - Contact local gas company.
b. Main burner orifice clogged - Clean main burner and main burner
orifice.
7. If burning at main burner orifice occurs (a loud, roaring blow torch
noise).
a. You must turn off burner assembly and contact a qualified service
person.
b. Main burner orifice is clogged or damaged - Clean main burner
and main burner orifice or replace main burner orifice.
c. Damaged main burner - Replace damaged main burner.
d. Gas regulator defective - Replace gas regulator.
8. Yellow flame in front section of main burner during main burner
combustion.
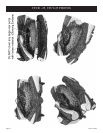
a. Not enough air - Check main burner for dirt and debris. If found,
clean main burner.
b. Gas regulator defective - replace gas regulator.
9. Slight smoke or odor during initial operation.
a. Residues from manufacturing processes and logs curing - Problem
will stop after a few hours of operation.
10. Heater produces a whistling noise when main burner is lit.
a. Turning control knob to HI position when main burner is cold -
Turn control knob to LO position and let warm up for a minute.
b. Air in gas line - Operate main burner until air is removed from
line. Have gas line checked by local gas company.
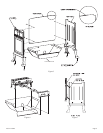
c. Air passageways on heater blocked - Observe minimum installation
clearances (see page 8).
d. Dirty or partially clogged main burner orifice - Clean main burner
and main burner orifice or replace main burner orifice.
11. Heater produces a clicking/ticking noise just after main burner is lit
or shut off.
a. Metal expanding while heating or contracting while cooling -
This is common with most heaters. If noise is excessive, contact
service person.
12. Heater produces unwanted odor.
a. Heater burning vapors from paint, hair spray, glues, cleaners,
chemicals, new carpet, etc. - Open window to ventilate room.
Stop using odor causing products while heater is operating.
b. Low fuel supply - Refill supply tank.
c. Gas leak - Locate and correct all leaks.
13. Heater shuts off in use (ODS operates).
a. Not enough fresh air is available - Open window and/or door for
ventilation.
b. Low line pressure - Contact local gas company.
c. ODS/pilot is partially clogged - Clean ODS/pilot.
14. Gas odor even when control knob is in OFF position.
a. Gas leak - Locate and correct all leaks.
b. Control valve defective - Replace control valve.
15. Gas odor during combustion.
a. Foreign matter between logs and main burner - remove foreign
matter.
b. Gas leak - Locate and correct all leaks.
TROUBLESHOOTING
SYMPTOMS - POSSIBLE CAUSES AND CORRECTIONS