


Reference Manual
IP2013, Rev BA
February 2012
4-7
Mobrey MSP422
c) If this value is correct, press the red button , and then press the green
button
to get to the next menu option.
d) Press the blue button
to start editing. The first digit will flash to indicate
it can be edited.
e) Press the green button
repeatedly to edit the flashing digit.
f) Press the blue button
to move to the next digit. The digit flashes to
indicate it can be edited.
g) Repeat steps (e) and (f) until the last digit is flashing, and edited as
required.
h) Press the blue button
to confirm the new 4 mA level. None of the digits
should now be flashing.
i) If the new value is correct, press the red button
to save. The display
changes to the next menu option.
j) If the new value is incorrect, press the blue button
to exit to the menu.
The “4” re-appears; re-start at step (b) or press
for the next menu.
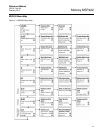
NOTE:
See Figure 4-1 on page 4-3 for a map of the programming menu structure and
how to access all the menu options.
To change the 20 mA value:
a) If entering the menu system from the PV display, press the green button
repeatedly until the “20” menu option is indicated (see above note.)
b) Press the blue button
to enter the menu for the 20 mA level. The
display indicates the present value of the 20 mA level.
c) If this value is correct, press the red button
, and then press the green
button
to get to the next menu option.
d) Press the blue button
to start editing. The first digit flashes to indicate it
can be edited.
e) Press the green button
repeatedly to edit the flashing digit.
f) Press the blue button
to move to the next digit. The digit flashes to
indicate it can be edited.
g) Repeat steps (e) and (f) until the last digit is flashing, and edited as
required.
h) Press the blue button
to confirm the new 20 mA level. None of the digits
should now be flashing.
i) If the new value is correct, press the red button
to save. The display
changes to the next menu option.
j) If the new value is incorrect, press the blue button
to exit to the menu.
The “20” re-appears; re-start at step (b) or press
for the next menu.
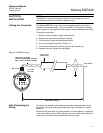
Setting the Output
Damping
Screen display: d
Default: 10
The damping value is a time constant in seconds, and is applied as smoothing
to the level reading and the output current. A new value may be entered up to
999 seconds. A larger value will have the effect of smoothing out rapid
changes of level, and smooth out the effects of turbulence and ripples on the
liquid surface. (It would be unusual to select a value greater than 30 seconds).
A value of zero may be edited, in which case no smoothing is applied to the
Current Output and transmitter readings immediately change the output.