


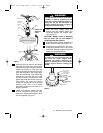
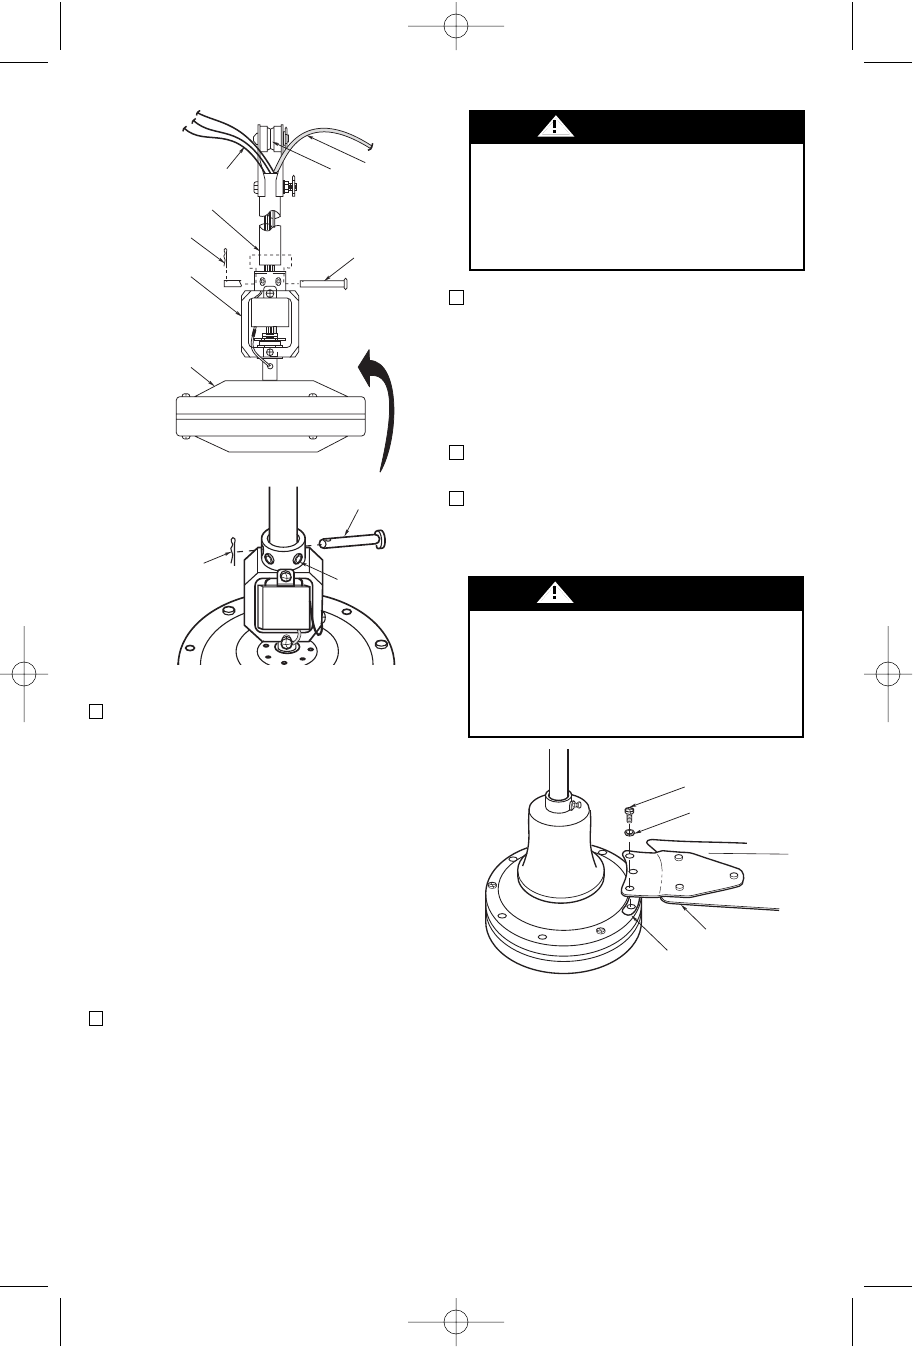
RUBBER
GROMMET
CLEVIS
PIN
HAIRPIN
CLIP
MOTOR
YOKE
HANGER PIPE
ASSEMBLY
MOTOR WIRE (3)
RETENTION
CABLE (1)
MOTOR
HAIRPIN
CLIP
CLEVIS
PIN
5/16-18
SETSCREW (2)
Figure 2
CANOPIES NOT
SHOWN FOR
CLARITY
4
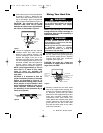
5. Slide the lower canopy down the
hanger pipe and securely tighten the
set-screw against the hanger pipe.
(See Figure 3.)
CAUTION: Blades come in balanced
sets of three. Do not mix blades if
installing more than one fan.
6. Install the blade gaskets between the
blades and the motor. (See Figure 3.)
7. Install the three blades onto the motor
using spring washers, M6 x 1/2" screws
and blade gaskets supplied. Securely
tighten the six blade screws.
It is critical that the clevis pin in the motor
coupling is properly installed and the
setscrews securely tightened. Failure to
verify that the pin and setscrews are
properly installed (as shown in Figure 3)
could result in the fan falling.
WARNING
To reduce the risk of personal injury, do
not bend the blade flanges when
installing the blades, balancing the
blades, or cleaning the fan. Do not insert
foreign objects between rotating fan
blades.
WARNING
BLADE
BLADE GASKET
SPRING WASHER
(2 PER BLADE)
M6 x 1/2" SCREW
(2 PER BLADE)
Figure 3
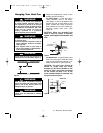
3. Align the clevis pin holes in the hanger
pipe with the holes in the motor yoke.
Install the clevis pin and secure with the
hairpin clip (Figure 2). The clevis pin
must go through the holes in the motor
yoke and the holes in the hanger pipe.
Push the straight leg of the hairpin clip
through the hole near the end of the
clevis pin until the curved portion of the
hairpin clip snaps around the clevis pin.
The hairpin clip must be properly
installed to prevent the clevis pin from
working loose. Pull on the rubber
grommet to make sure the clevis pin is
properly installed.
4. Install and securely tighten the two
5/16-18 setscrews in the motor yoke
against the hanger pipe using the allen
wrench supplied. (Figure 2.)
U.L. Model No.: HF948, HF956
BP7311 48 56" Heat Fans 1/16/08 10:52 AM Page 4