


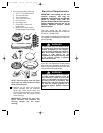
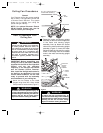
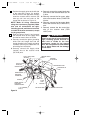
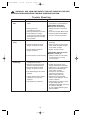

7
UPPER
GLASS
INSTALL THREE M4 x 12mm
PAN HEAD SCREWS AND
RUBBER WASHERS
15-WATT
(MAX.)
CANDELABRA
BULBS (4)
MOTOR
AND
HOUSING
UPLIGHT
ASSEMBLY
Figure 5
9. Screw in four 15-watt (maximum)
candelabra bulbs (not supplied) in the
motor and housing uplight assembly
sockets (Figure 5).
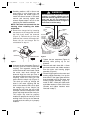
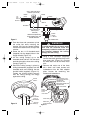
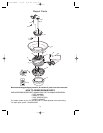
10. Place the ceiling canopy over the
downrod. Then reinstall the hanger
ball (Figure 6) on the downrod as
follows. Route the three 80” motor
leads through the hanger ball and
slide the hanger ball over the
downrod. Position the pin through the
two holes in the downrod and align
the hanger ball so the pin is captured
in the groove in the top of the hanger
ball. Pull the hanger ball up tight
against the pin and securely tighten
the setscrew in the hanger ball. A
loose setscrew could create fan
wobble.
SETSCREW
DOWNROD
CEILING
CANOPY
HANGER
BALL
PIN
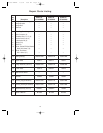
How to Hang
Your Ceiling Fan
The fan must be hung with at least 7'
of clearance from floor to blades
(Figure 7).
!
WARNING
CEILING
FLOOR
AT
LEAST
7'
Figure 7
11. The fan comes with blue, black and
white leads that are 80” long. Before
installing the fan, measure up
approximately 6 to 9-inches above
top of hanger ball/downrod assembly.
Cut off excess leads and strip back
insulation 1/2” from end of leads.
12. You have now completed the initial
assembly of your new ceiling fan. You
can now proceed with hanging and
wiring your fan.
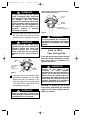
The outlet box and joist must be
securely mounted and capable of
supporting at least 50 lbs. Use only a
U.L. outlet box listed as “Acceptable
for Fan Support”.
!
WARNING
Figure 6
BP7309 BANFF 1/5/06 9:59 AM Page 7