


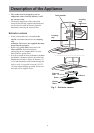

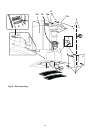


Installation
Mounting accessories included
1 deflector
1 chimney support
1 reduction flange Ø 125-120 mm
1 charcoal filter (already fitted)
8 wood-screws 5 x 45 mm (for wall mounting - 2 as spare parts)
8 wall plugs Ø 8 mm (for wall mounting - 2 as spare parts)
6 washers (2 for chimney support - 2 for lower fixing - 2 as spare parts)
8 metal screws 3,5 x 6,5 (for all fixing except - lower chimney fixing)
2 metal screws 3,5 x 9,5 (lower chimney fixing)
We reserve the right to change specifications and colours as a result of our policy of continuing
technological development.
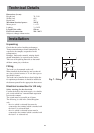
Wall mounting
Disconnect the hood during electrical connection, by turning the home mains switch off.
Mark the wall with a centre line, this will aid mounting procedure (1), position the template so that the mid line
printed on the template matches with the centre line previously drawn, the lower side of the template
corresponds to the lower side of the hood once mounted (2).
Drill four holes Ø 8mm and fit four wall plugs (3).
Drill two holes Ø 8mm on the upper side close to the ceilling (4) use the chimney support as a template,
check that the mid of the chimney support corresponds to the mid of the centre line previously drawn, fit two
wall plugs.
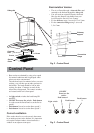
Note: ONLY in case the hood is to be used in filter version, mount the deflector E on the chimney support
and the connection flange G with two screws each (5).
Put the chimney support close to the ceiling to the vertical of the cooking place, use the centre line (1) for
easy positioning, mark two holes onto the wall and drill, then insert two wall plugs and fix the chimney support
with two screws and washers (6).
Screw two screws (do not tighten completely, leave them so that can be used to hang the hood), hang the
hood (7), remove the grease filters and fix it definitively with two screws and washers (8), check that all four
screws are securely tightened.
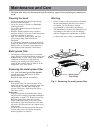
Fit an exhaust pipe (9) to connect the outlet hole D of the hood to the connection flange G of the deflector E
(Filter version) or to the outside (Extractor version).
Make electrical connection (10), but leave the hood disconnected from the mains supply.
Place the cable clamp in the corresponding housing (11).
Fix the control panel to the rear bracket on the lower section of the chimney with two screws (12 - Cable
must be positioned upwards to have correct position of control switches).
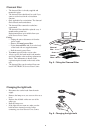
Position the chimney and secure them in place, first up (13a) to the chimney support (13b) .
Then slide the chimney downwards making sure the cable clamp (step 11) is seated in the housing on
chimeny (14).
Fix the lower section of the chimney with two screws from the inside of the hood (15).
Refit the grease filters, connect the hood the the home general electric panel and check if the hood work
properly.