


6
U.L. Model No.: CF205
How to Assembly Your Ceiling Fan
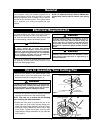
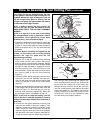
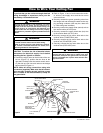
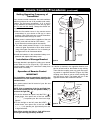
It is critical that the clevis pin in the motor coupling
is properly installed and the setscrews securely
tightened. Failure to verify that the pin and setscrews
are properly installed (as shown in Figure 6) could
result in the fan falling.
WARNING
!
9. Tighten the setscrews (Figure 6) securely while
pulling up on the downrod.
NOTE: The setscrews must be properly installed
as described above, or fan wobble could result.
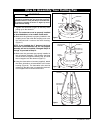
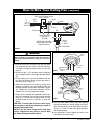
10.Make sure the grommet Is properly installed in the
coupling cover, then slide the coupling cover over
the downrod until it rests on the motor housing.
(Figure 7).
NOTE: If you installed the 6” downrod, the three
decorative rod assemblies and the rod support
assembly will not be installed. Disregard Steps 12
through 14; proceed to Step 15.
11.Make sure the grommets are properly installed in
the rod support assembly. Then position the three
screws in the rod support toward the top, and slide
the rod support over the downrod (Figure 7).
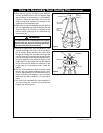
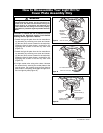
12.Using the decorative rod screws (supplied), attach
the three decorative rod assemblies to the motor
housing (Figure 8). The decorative rods must be
oriented so that they lean in towards the downrod.
Do not tighten the rod screws at this time.
DOWNROD
MOTOR
COUPLING
HAIRPIN
CLIP
CLEVIS PIN
SETSCREW (2)
REVERSE
SWITCH
Figure 6
ROD SUPPORT
ASSEMBLY
MOTOR
HOUSING
GROMMET
COUPLING
COVER
SCREWS (3)
(Toward Top)
Figure 7
DECORATIVE ROD
ASSEMBLY
DECORATIVE
ROD SCREW
Figure 8