


www.desatech.com
119794-01A
3
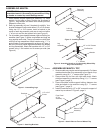
Figure 6 - Attach Side/Front Assembly to Mantel Top
Figure 7 - Attach Middle Support to Mantel Top Assembly
Mantel Top
Front/Side
Assembly
Mantel Top
Middle Support
Front Panel
of Top
Assembly
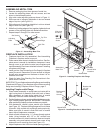
ATTACHING MANTEL TOP ASSEMBLY TO
HEADER/LEG ASSEMBLY
1. Turn top assembly and header/leg assembly upside down
if not already in this position. Place header/leg assembly
inside top (see Figure 10). The rear of legs should be
ushwithbackoftopandcenteredlefttoright.
2. Using pocket holes and 1
1
/
4
" screws provided, attach
header/leg assembly to mantel top. Attach supplemental
brackets using 1/2" - 3/4" screws provided in bracket
hardware pack. Use 3 brackets to attach mantel top as-
sembly - one at the back of each leg assembly and one
at the center of the header (see Figure 10).
Figure 10 - Attaching Top to Leg and Header Assembly
1/2"-3/4"
Bracket
Screws
Bracket
1/2"-3/4
Bracket Screws
Bracket
1
1
/
4
" Screws for
Pocket Holes
Bottom Panel of Mantel
Top Assembly
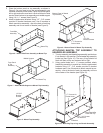
Figure 9 - Bottom Panel of Mantel Top Assembly
Legs Should Be
Flush With Top
1
1
/
4
" Screws for
Pocket Holes
L-Bracket
1/2" - 3/4" Screws
for Brackets
Figure 8 - Mantel Top Assembly
5. Place the bottom panel on top assembly as shown in
Figure 9. You may want to turn the entire assembly over
for better access to pocket holes. Center the bottom panel
lefttorightandmakesurebackisushwithbackofside
panels. Attach bottom to top assembly and middle support
using (14) 1
1
/
4
" screws (see Figure 9).
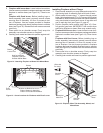
6. Attach supplemental brackets using 1/2" - 3/4" screws
provided in bracket hardware pack. Use 2 brackets to
attach mantel top assembly - one at the back of each leg
assembly and one at center of header (see Figure 9).