


www.desatech.com
113084-01A 15
OPERATING HEATER
Continued
WARNING: Burners will
come on automatically within
one minute when the remote se-
lector switch is in the ON posi-
tion after the pilot is lit.
4. Press in and turn control knob clockwise
to the OFF position.
5. Wait five (5) minutes to clear out any gas.
Then smell for gas, including near the floor.
If you smell gas, STOP! Follow “B” in the
safety information in column 2, page 14. If
you don’t smell gas, go to the next step.
6. Press in and turn control knob counter-
clockwise to the PILOT position.
Press in control knob for five (5) seconds
(see step 5).
Note:
You may be running this heater for
the first time after hooking up to gas sup-
ply. If so, the control knob may need to be
pressed in for 30 seconds or more. This will
allow air to bleed from the gas system.
7. With control knob pressed in, press and re-
lease ignitor button. This will light pilot.
The pilot is attached to the front burner (see
Figure 13, page 11). If needed, keep press-
ing ignitor button until pilot lights.
Note:
If pilot does not stay lit, contact a
qualified service person or gas supplier for
repairs. Until repairs are made, light pilot
with match. To light pilot with match, see
Manual Lighting Procedure, page 16.
8. Keep control knob pressed in for 30 sec-
onds after lighting pilot. After 30 seconds,
release control knob.
• If control knob does not pop out when re-
leased, contact a qualified service person
or gas supplier for repairs.
Note:
If pilot goes out, repeat steps 4
through 8.
9. Slightly push in and turn control knob coun-
terclockwise to the ON position.
10. Wait one minute and switch remote selector
switch to the ON position to light burners.
Note:
AUTO is only functional when using
GWMT1 or GWMS2 optional accessories.
11. Set flame adjustment knob to any level be-
tween HI and LO.
CAUTION: Do not try to ad-
just heating levels by using the
equipment shutoff valve.
WARNING: Make sure the
selector switch is in the OFF
position when you are away from
home for long periods of time.
Heater will come on automati-
cally with selector switch in the
ON position.
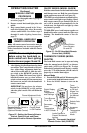
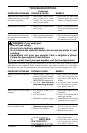
O
F
F
P
I
L
O
T
O
N
L
O
I
H
AUTO
OFF
ON
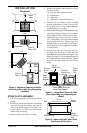
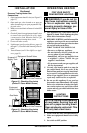
Figure 20 - Control Knob and Ignitor
Button Location (Shown as Supplied, No
Control Options)
Ignitor Button
Selector Switch in OFF Position
(Optional Remote Control)
Flame Adjustment Knob
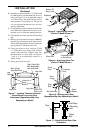
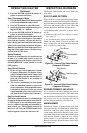
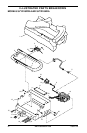
Ignitor
Electrode
Pilot Burner
Figure 21 - Pilot
Thermocouple
Control Knob
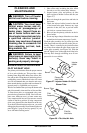
TO TURN OFF GAS
TO APPLIANCE
Shutting Off Heater
1. Turn control knob clockwise to the
OFF position.
2. Set selector switch in the OFF position to
keep from draining battery.
Shutting Off Burners Only (pilot stays lit)
You may shut off the burners and keep the pi-
lot lit by doing one of the following:
1. Turn control knob clockwise to the
PILOT position.
2. Use remote control manual OFF button.
3. Set remote selector switch in the OFF
position.