


www.desatech.com
119526-01A 11
INSTALLATION
Continued
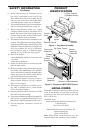
Actual Framing
Height 32
3
/
8
" 33"
Front Width 34
5
/
16
" 35
1
/
8
"
Depth 16
11
/
16
" 17
3
/
4
"
BUILT-IN FIREPLACE
INSTALLATION
Built-in installation of this fireplace involves
installing replace into a framed-in enclosure.
This makes the front of replace ush with wall.
If installing a mantel above the replace, you must
follow the clearances shown in Figure 18, page 13.
Follow the instructions below to install the replace
in this manner.
WARNING: A qualied electri-
cian must connect electrical wiring
to duplex outlet for built-in instal-
lation. Follow all local codes.
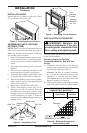
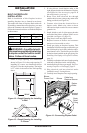
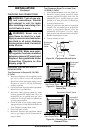
1. Frame in rough opening. Use dimensions
shown in Figure 12 for the rough opening. If
installing in a corner, use dimensions shown
in Figure 13 for the rough opening. The height
is 33" which is the same as the wall opening
above.
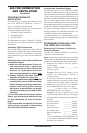
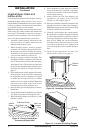
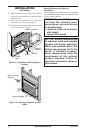
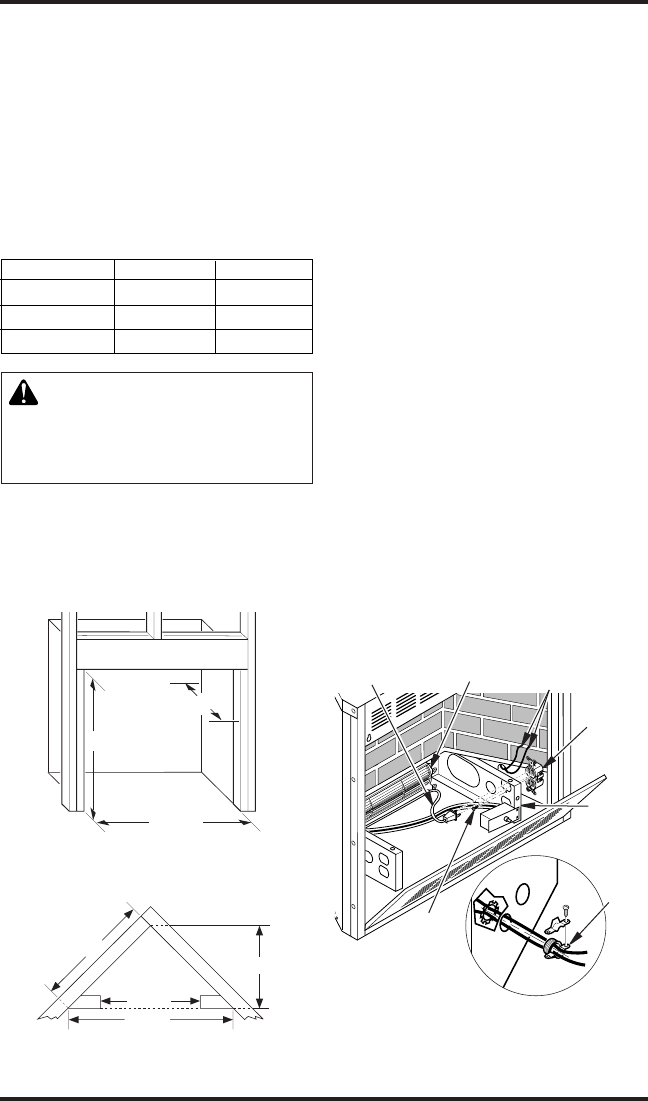
2. If using blower, install duplex outlet to the
right support bracket in the bottom of rebox
(see Figure 14). See Accessories, page 29. If
not using blower, go to step 7.
3. Route wires from electrical box through
smallest hole in outer casing using strain relief
tting provided (see Figure 14).
4. Connect wires from the electrical box to
duplex outlet. Match wire colors to those
indicated on duplex outlet. Be sure to connect
ground wire.
5. Install shield to end of right support bracket
and behind the rebox wrapper with 2 screws
provided (see Figure 15, page 12).
6. Plug blower cord into duplex outlet.
7. Replace bottom of firebox and reconnect
remote receiver module to valve.
8. Install gas piping to replace location. This
installation includes an approved exible gas
line (if allowed by local codes) after the equip-
ment shutoff valve. The exible gas line must
be the last item installed on the gas piping. See
Installing Gas Piping to Fireplace Location,
page 13.
9. Carefully set replace in front of rough opening
with back of replace inside wall opening.
10. Attach exible gas line to gas supply. See Con-
necting Fireplace to Gas Supply, page 15.
11. Plug electrical cord into electrical outlet
installed in step 2 if using blower.
12. Carefully insert replace into rough opening.
35
1
/8"
17
3
/4"
33"
Figure 12 - Rough Opening for Installing
in Wall
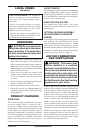
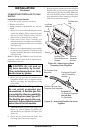
39
3
/
8
"
27
7
/
8
"
55
5
/
8
"
35
1
/
8
"
Figure 13 - Rough Opening for Installing
in Corner
Blower
Support
Bracket
Cable from
Electrical Source
Duplex
Outlet
Screw
Blower
Power Cord
Strain
Relief
Fitting
Figure 14 - Connecting Duplex Outlet