


9
104462
OWNER’S MANUAL
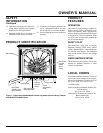
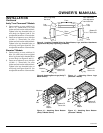
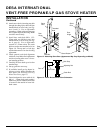
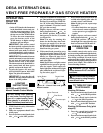
Figure 8 - Locating Threaded Holes for Stove Bottom, Legs, and Door Attachment
(Appearance May Vary Depending on Model)
Leg
Hole
Leg
Hole
Leg
Hole
Leg
Hole
Door Hinge Step
Bolt Hole
Door Catch Bolt
With Adjustable
Hex Nuts Hole
Stove
Bottom
Hole
Front
Bottom Of
Stove Unit
Amity™ and Townsend™ Models
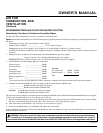
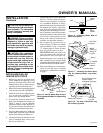
8. Fasten each leg to stove with four (4)
M8 x 1.25 - 20mm bolts. Use a flat
washer and lock washer with each bolt.
Tighten bolts into threaded holes on
stove body (see Figures 8 and 9). Use
an adjustable wrench or a 12mm socket.
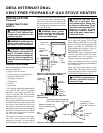
9. Fasten stove bottom to stove with four
(4) M6 x 1 - 25mm bolts. Use a flat
washer and lock washer with each bolt.
Tighten bolts into threaded holes on
stove body (see Figures 8 and 10). Use
an adjustable wrench or a 10mm socket.
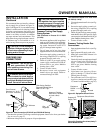
Sheraton™ Models
8. Fasten each leg to stove with four (4)
bolts. Use a flat screw driver to tighten
bolt to leg. Insert bolt in threaded holes
on stove body (see Figures 8 and 11).
9. Fasten stove bottom to stove with four
(4) M6 x 1 - 25mm bolts. Use a flat
washer and lock washer with each bolt.
Tighten bolts into threaded holes on
stove body (see Figures 8 and 12). Use
an adjustable wrench or a 10mm socket.
INSTALLATION
Continued
Figure 9 - Attaching Stove Legs (Amity™
Model Shown)
Bottom Of
Stove Unit
Leg
Bolt
Washers
Figure 10 - Attaching Stove Bottom
(Amity™ Model Shown)
Bottom Of
Stove Unit
Bolt
Washers
Stove
Bottom
Figure 11 - Attaching Stove Legs
(Sheraton™ Model)
Bottom Of
Stove Unit
Leg
Bolt
Figure 12 - Attaching Stove Bottom
(Sheraton™ Model)
Bottom Of
Stove Unit
Bolt
Washers
Stove
Bottom
Continued