


17
104462
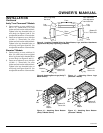
OWNER’S MANUAL
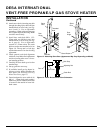
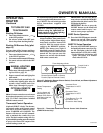
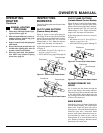
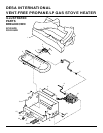
Thermocouple
Pilot Burner
Figure 31 - Correct Pilot Flame Pattern
Figure 32 - Incorrect Pilot Flame Pattern
INSPECTING
BURNERS
Check pilot flame pattern and burner flame
patterns often.
PILOT FLAME PATTERN
(Remote-Ready Models)
Figure 31 shows a correct pilot flame pat-
tern. Figure 32 shows an incorrect pilot flame
pattern. The incorrect pilot flame is not heat-
ing the thermocouple. This will cause the
thermocouple to cool. When the thermo-
couple cools, the heater will shut down.
If pilot flame pattern is incorrect, as shown
in Figure 32
• turn heater off (see To Turn Off Gas to
Appliance, page 15 or 16)
• see Troubleshooting, pages 18 through 20
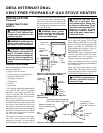
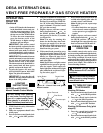
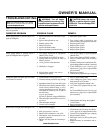
Thermocouple
Pilot Burner
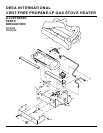
PILOT FLAME PATTERN
(Variable-Manual Control Models)
Figure 33 shows a correct pilot flame pattern.
Figure 34 shows an incorrect pilot flame
pattern. The incorrect pilot flame is not heat-
ing the thermocouple. This will cause the
thermocouple to cool. When the thermo-
couple cools, the heater will shut down.
If pilot flame pattern is incorrect, as shown
in Figure 34
• turn heater off (see To Turn Off Gas to
Appliance, page 16 or 16)
• see Troubleshooting, pages 19 through 21
Figure 33 - Correct Pilot Flame Pattern
Figure 34 - Incorrect Pilot Flame Pattern
Thermocouple
Pilot Burner
Pilot Burner
Thermocouple
BURNER PRIMARY AIR
HOLES
Air is drawn into the burner through the
holes in the fitting at the burner entrance.
These holes may become blocked with dust
or lint. Periodically inspect these holes for
any blockage and clean if needed. Blocked
air holes will create soot.
MAIN BURNER
Periodically inspect all burner flame holes
with the heater running. All slotted burner
flame holes should be open with yellow
flame present. All round burner flame holes
should be open with a small blue flame
present. Some burner flame holes may be-
come blocked by debris or rust, with no
flame present. If so, turn off heater and let
cool. Remove blockage. Blocked burner
flame holes will create soot.
MANUAL LIGHTING
PROCEDURE
1. Follow steps 1 through 5 under Light-
ing Instructions, page 16.
2. Pilot is located inside stove cavity at-
tached to burner. Lift off top grate
to allow access to pilot.
3. Depress control knob and light pilot
with match.
4. Keep control knob pressed in for 30
seconds after lighting pilot. After 30
seconds, release control knob.
5. Place top grate back into position.
Now follow step 8 under Lighting
Instructions, page 16.
OPERATING
HEATER
Continued