


107123-01F
For more information, visit www.desatech.com
For more information, visit www.desatech.com
19
19
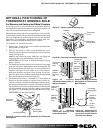
OPERATING HEATER (THERMOSTATICALLY-CONTROLLED MODELS)
Lighting Instructions
To Turn Off Gas To Appliance
WARNING:
• If fireplace has glass doors, never operate this
heater with glass doors closed. If you operate
heater with doors closed, heat buildup inside fire-
place will cause glass to burst. Also if fireplace
opening has vents at the bottom, you must open
the vents before operating heater.
• You must operate this heater with a fireplace screen
in place. Make sure fireplace screen is closed
before running heater.
NOTICE: During initial operation of new heater, burn-
ing logs will give off a paper-burning smell. Orange
flame will also be present. Open damper or window to
vent smell. This will only last a few hours.
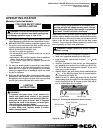
Note:
Home owners generally prefer to operate their heater
with the chimney damper closed. This will put all the heat into
the room. However, there may be times you will desire the full
flames of the HI heat setting but will find the heat output
excessive. You can open the chimney damper (if you have one)
fully or partially to release some of the heat.
WARNING: Damper handle will be hot if heater
has been running.
OPERATING HEATER
Continued
1. STOP! Read the safety information in column 2, page 18.
2. Make sure equipment shutoff valve is fully open.
3. Turn control knob clockwise
Clockwise
to the OFF position.
4. Wait five (5) minutes to clear out any gas. Then smell for
gas, including near the floor. If you smell gas, STOP! Fol-
low “B” in the safety information in column 2, page 18. If
you don’t smell gas, go to the next step.
5. Turn control knob counterclockwise
C-clockwise
to the PILOT
position. Press in control knob for five (5) seconds (see Fig-
ure 40).
Note:
You may be running this heater for the first time
after hooking up to gas supply. If so, the control knob may
need to be pressed in for 30 seconds or more. This will al-
low air to bleed from the gas system.
• If control knob does not pop out when released, contact
a qualified service person or gas supplier for repairs.
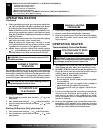
6. With control knob pressed in, press and release ignitor but-
ton. This will light pilot. The pilot is attached to the front
burner. If needed, keep pressing ignitor button until pilot lights.
Note:
If pilot does not stay lit, contact a qualified service
person or gas supplier for repairs. Until repairs are made,
light pilot with match. To light pilot with match, see Manual
Lighting Procedure. page 20.
7. Keep control knob pressed in for 30 seconds after lighting
pilot. After 30 seconds, release control knob.
Note:
If pilot goes out, repeat steps 3 through 7. This heater
has a safety interlock system. Wait one (1) minute for sys-
tem to reset before lighting pilot again.
8. Turn control knob counterclockwise
C-clockwise
to desired
heating level. The burners should light. Set control knob to
any heat level between HI and LO.
L
O
H
I
O
F
F
P
i
l
o
t
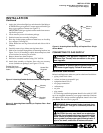
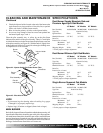
Figure 40 - Control Knob and Ignitor Button Location
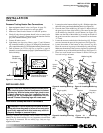
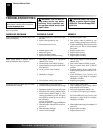
Figure 41 - Pilot
Control Knob
Ignitor Button
Thermocouple
Ignitor Electrode
Pilot Burner
CAUTION: Do not try to adjust heating levels by
using the equipment shutoff valve.
Shutting Off Heater
Turn control knob clockwise
Clockwise
to the OFF position.
Shutting Off Burners Only (pilot stays lit)
Turn control knob clockwise
Clockwise
to the PILOT position.
LIGHTING
INSTRUCTIONS
TO TURN OFF GAS
TO APPLIANCE