


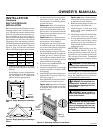

8
104326
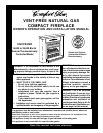
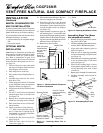
VENT-FREE NATURAL GAS COMPACT FIREPLACE
CGCF26NR
INSTALLATION
NOTICE: A qualified service per-
son must install fireplace. Follow
all local codes.
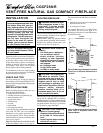
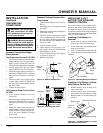
You can recess firebox into the wall. You
can also position fireplace in the optional
cabinet or corner mantels.
IMPORTANT:
Only use optional cabinet
or corner mantels specified in this manual.
Purchase the optional mantel from your
dealer (see Accessories, page 21).
CAUTION: This fireplace cre-
ates warm air currents. These
currents move heat to wall sur-
faces next to fireplace. Installing
fireplace next to vinyl or cloth
wall coverings or operating fire-
place where impurities (such as
tobacco smoke, aromatic
candles, cleaning fluids, oil or
kerosene lamps, etc.) in the air
exist, may discolor walls.
IMPORTANT:
Vent-free fireplaces add mois-
ture to the air. Although this is beneficial,
installing fireplace in rooms without enough
ventilation air may cause mildew to form from
too much moisture. See Air for Combustion
and Ventilation, pages 5 through 7.
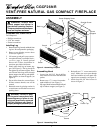
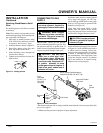
LOCATING FIREPLACE
WARNING: Maintain the mini-
mum clearances shown in Fig-
ures 6 and 7. If you can, provide
greater clearances from floor,
ceiling, and joining wall.
CHECK GAS TYPE
Use only natural gas. If your gas supply is
not natural gas, do not install fireplace. Call
dealer where you bought fireplace for proper
type fireplace.
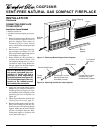
INSTALLATION ITEMS
Before installing fireplace, make sure you
have the items listed below.
• piping (check local codes)
• sealant (resistant to propane/LP gas)
• manual shutoff valve *
• ground joint union
• sediment trap
• tee joint
• pipe wrench
• test gauge connection*
* An A.G.A. design-certified manual shutoff
valve with 1/8" NPT tap is an acceptable
alternative to test gauge connection. Pur-
chase the optional A.G.A. design-certified
manual shutoff valve from your dealer. See
Accessories, page 21.
Note:
If desired, purchase a four-sided brass trim kit
for built-in installations. See Accessories, page 21.
Note:
Your Comfort Glow fireplace is de-
signed to be used in zero clearance installations.
Wall or framing material can be placed directly
against any exterior surface on the fireplace,
except where stand-off spacers are integrally
attached. If stand-off spacers are attached to
your fireplace, these spacers can be placed
directly against wall or framing materials.
Use the dimensions shown for rough openings
to create the easiest installation (see Built-In
Fireplace Installation, page 8).
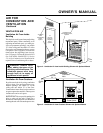
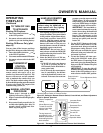
Figure 7 - Mounting Clearances As Viewed
From Front of Fireplace Shown with
Optional Mantel
CAUTION: If you install the
fireplace in a home garage
• fireplace pilot and burner must
be at least 18 inches above
floor.
• locate fireplace where moving
vehicle will not hit it.
For convenience and efficiency, install fire-
place
• where there is easy access for operation,
inspection, and service.
• in coldest part of room.
An optional blower kit is available from
your dealer. See Accessories, page 21. If
planning to use blower, locate fireplace near
an electrical outlet.
6"
Minimum
From
Sides Of
Fireplace
Left
Side
CEILING
36"
Minimum
FLOOR
Right
Side
Top Of
Mantel Can
Be Flush
With Wall
Left
Side
CEILING
Right
Side
36"
Minimum
Figure 6 - Mounting Clearances As Viewed
From Front of Fireplace Shown Built In
The Wall
WARNING: Never install the
fireplace
• in a bedroom or a bathroom
• in a recreational vehicle
• where curtains, furniture,
clothing, or other flammable
objects are less than 36 inches
from the front, top, or sides of
the fireplace
• as a fireplace insert
• in high traffic areas
• in windy or drafty areas
NOTICE: This heater is intended
for use as supplemental heat. Use
this heater along with your pri-
mary heating system. Do not in-
stall this heater as your primary
heat source. If you have a central
heating system, you may run
system’s circulating blower while
using heater. This will help circu-
late the heat throughout the
house. In the event of a power
outage, you can use this heater
as your primary heat source.