


110882-01C
For more information, visit www.desatech.com
For more information, visit www.desatech.com
11
11
INSTALLATION
Continued
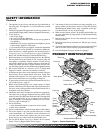
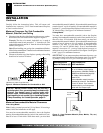
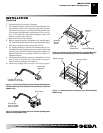
Heater Gas
Regulator
Flexible Gas Hose (if
allowed by local codes)
Figure 11 - Attaching Flexible Gas Hose to Heater Gas Regulator
(Variable Manually-Controlled and Thermostatically-Controlled
Models Only)
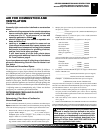
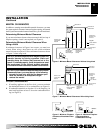
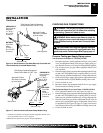
Figure 13 - Attaching Heater to Fireplace Floor (Variable Manually-
Controlled and Thermostatically-Controlled Models Only)
Masonry
Screw
Mounting
Bracket
Screw
Mounting
Bracket Nut
Mounting Bracket
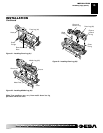
3. Position heater base assembly in fireplace.
4. For Variable Manually-Controlled and Thermostatically-Con-
trolled Models mark screw locations through holes in mount-
ing brackets (see Figure 13). For Remote-Ready Models mark
screw locations through holes in front panel of base (see Fig-
ure 14). If installing in a brick-bottom fireplace, mark screw
locations in mortar joint of bricks.
5. Remove heater base from fireplace.
6. Remove mounting brackets from heater base (Variable Manu-
ally-Controlled and Thermostatically-Controlled Models Only).
7. Drill holes at marked locations using 3/16" drill bit.
8. For Variable Manually-Controlled and Thermostatically-Con-
trolled Models attach mounting brackets to fireplace floor using
masonry screws provided in hardware package (see Figure 13).
Reattach heater base to mounting brackets (see Figure 13).
Tighten nuts firmly.
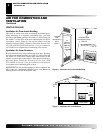
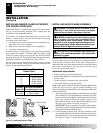
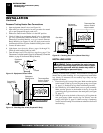
9. For Remote-Ready Models attach base, through holes in front
panel of base, to fireplace floor using masonry screws pro-
vided in hardware package (see Figure 14).
10. Connect to gas supply. See Connecting To Gas Supply, page 12.
INSTALLATION
Installing Heater Base Assembly (Cont.)
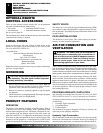
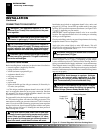
Figure 12 - Attaching Flexible Gas Hose to Heater Gas Regulator
(Remote-Ready Models Only)
Figure 14 - Attaching Base to Fireplace Floor (Remote-Ready
Models Only)
Gas Control
Flexible Gas
Hose (if allowed
by local codes)
Masonry Screw
Masonry Screw