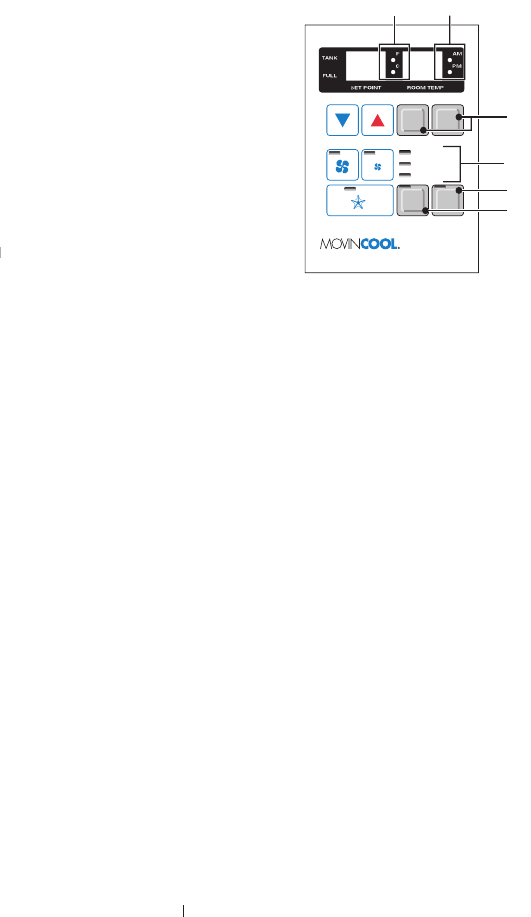
5
7.
Temperature Scale LED - Illu
minates to indicate
the current temperatures being displayed are
either in °C or °F; also used to display the clock
when programming.
8. AM/PM
LED - Illuminates to indicate AM or PM
time of day.
9.
Program
RUN
Button - Activates/deactivates a
program.
10.
Program
SET
Button - Allows the user to pro-
gram the unit or check the current program.
11.
S
TART TIME
LED,
E
ND TIME
LED,
S
ET
CLOCK
LED - Illuminates to indicate the cur-
CLOCK LED - Illuminates to indicate the cur-CLOCK
rent step that is being programmed into the
unit.
12.
C
LOCK/TIMER
Buttons - Allows the user to set the clock and program the start and
end time of opera
tion.
Operating in COOL Mode
➀
The unit can be operated in COOL mode by pressing the C
OOL
ON/OFF button (LED illuminates).
NOTE: In COOL mode the unit can only be turned off by pressing the “C
OOL
ON/
OFF” button again, not by pressing the fan buttons.
➁
Change the fan speed by pressing the HIGH or LOW fan buttons.
➂
Change the temperature set point by pressing the SET TEMP buttons (
▼
/
▲
).
NOTE: When turning the unit on, the set point and fan speed are determined by the
last operating mode (program mode not included).
Operating in Fan Only Mode
➀
The unit can also be operated in Fan Only mode by pressing either the HIGH or LOW
fan buttons (LED illuminates).
➁
The unit can then be turned off by pressing the fan speed button that is illuminated.
Changing from Fan Only Mode to COOL Mode
➀
The C
OOL
mode can be activated while the unit is operating in Fan Only mode. To do
this, simply press the C
OOL
O
N
/O
FF
button (LED illuminates).
NOTE: The Fan Only mode will not operate after the C
OOL
mode has been activated.
After the COOL mode has been activated, the unit cannot be turned off by pressing
SET TEMP CLOCK/TIMER
FA
N ON/OFF
COOL ON/OFF PROGRAM
Office Pro 36
SET
START TIME
END TIME
SET CLOCK
RUN
HRS MIN
87
12
11
9
10
the fan buttons. The C
OOL
O
N
/O
N/ON
FF
button must be pressed.
FF button must be pressed.FF


