


1
1
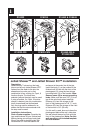
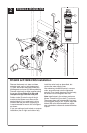
Jetted Shower™ and Jetted Shower XO™ Installation
Description:
Jetted Shower™ valves turn the body
jets on and off only. Jetted Shower XO™
valves divert the water to the jets, the
showerhead, an extra port or any
combination of two, making it a 3 port, 6
function diverter. The black stem
extender (without the stop) must be used
if using all outlets. If a 2 port, 3 function
diverter is desired, jets only, combination
jets & showerhead and showerhead
only, the plug must be soldered in as
shown and the blue stem extender with
the stop must be used.
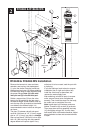
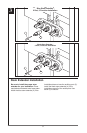
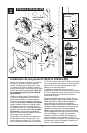
Installation Instructions:
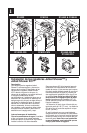
Shut off water supplies. Consider the
type and thickness of your finished wall
before placing your stringer back plate.
Mount the valve to desired height. We
recommend 52" from the base of the
R18224
R18222
R18224-WS
R18222-WS
1
R18442 & R18448
4
R18442-WS &
R18448-WS
enclosure to the center line of the jets.
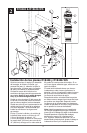
Install the body (1) so the surface of the
finished wall is flush with the front of the
plasterguard (2), using the two stringer
mounting holes (3) on the bracket. Note:
Remove cover (4) to access mounting
holes. Make sure the word “UP” (5) is on
top of the valve body when installing.
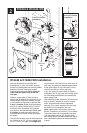
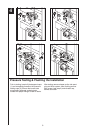
Distance (A) from the stringer to the
front of the plasterguard is 2.8" (71 mm).
Distance (B) from the stringer to the front
of the bonnet is 3.9" (99 mm).
If a thin wall is used, be sure to have the
plasterguard behind the wall, otherwise
the wall should always be flush with the
front of the plasterguard. Note: For thin
wall mounting, use included template
for hole location.
A
B
4
3
3
2
5
4
A
B
3
3
5
1
2
A
B
3
3
5
2
3