


27
ENGLISH
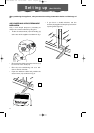
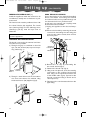
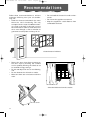
2) Screw the support
blocks (13) to the exter-
nal unit using the M4
screws (17) (taking care
to position them with
the hole for the screw
on top).
3) Attach the external unit
to the brackets, fixing it
with the M6 screws. (17)
Alternatively, for temporary
installation, the external unit can be suspended
as shown in fig. 15. In
this case, use the belts
(14) supplied; hook
these to the eyes (15);
before inserting the
eyes, remove the rub-
ber seals.
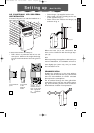
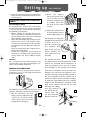
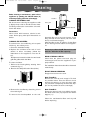
The external unit may
be installed above or at the same level as the
internal unit, provided that the difference in
level is not greater than 1.5m. the air intake
and discharge of the external unit must be
kept clear of obstacles. Leave at least 6 cm
between the wall and the appliance. Con-
densation forming during operation is elimina-
ted via evaporation from the external unit. In
particular cases, if there is excessive humidity,
to eliminate condensation the drain coupling
must be used. This should be mounted on the
base of the external unit (see fig. 16) after
removing the rubber
seal. The external
unit should be pro-
tected from the
sun, rain, snow and
drips from the roof.
The external unit can also be hung on a wall
using the brackets (12). Proceed as follows:
1) FFix the bracket to the wall
taking care to position it as indi-
cated in fig. 12. (For the holes,
use the jig on the cover of the
polystyrene packaging);
Setting up (Mod. FX400ECO)
1
2
Wheel
Coupling
Seal
7) Undo the two self tapping screws holding
the guard and remove the electrical con-
nection block.
AVOID TIGHT CURVES IN THE CONNECTION
SHEATH
Reconnecting the sheath
To reconnect the ends of the connecting
sheath to the internal unit, repeat operations
1, 2, 3, 4, 5, 6 and 7 in reverse order, observing
the following precautions:
• Before passing the sheath through the
hole in the wall, it is advisable to protect
the threaded ends of the quick couplings
with insulating tape or similar.
•Fit the two top refrigerant couplings to the
bottom two and hand tighten them,
checking to ensure that they fit well. Tigh-
ten properly with the spanners used pre-
viously.
• After connecting the two refrigerant cou-
plings, attach the stays.
• Check the refrigerant connections for
leakage by covering the joints with some
soapy water. No soap bubbles should
form.
Attention
We recommend that disconnection and
reconnection of the quick couplings be car-
ried out by qualified personnel.
PREPARING THE EXTERNAL UNIT
The external unit can be placed on a terrace
or balcony. (fig 11). In this case the brackets
should not be used.
11
12
13
14
15
16
FX160/400ECO GB 20-06-2002 16:51 Pagina 27