9
GAS REQUIREMENTS
LP TANK REQUIREMENTS
A dented or rusty LP tank may be
hazardous and should be checked by
your LP supplier. Never use a cylinder
with a damaged valve.
The LP gas cylinder must be constructed and marked in accordance with the specifications for
LP gas cylinders of the U.S. Department of Transportation (DOT) and designed for use with a
Type 1 system only.
Do not change the regulator/hose assembly from that supplied with the unit or attempt to use
a Type 1 equipped regulator/hose assembly with a standard 510 POL tank/valve assembly. The
cylinder must be provided with a shut-off valve terminating in an LP gas supply cylinder valve
outlet specified,as applicable, for connection Type 1.
If the appliance is stored indoors, the cylinder must be disconnected and removed from the
appliance.
Cylinders must be stored outdoors in a well ventilated area out of the reach of children.
Gas cylinder supply must be turned off when not in use.
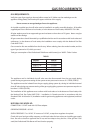
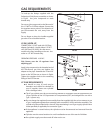
To hook-up the fittings supplied with the
Professional Side Burner, assemble as shown
in Fig.03. Use joint compound on male
threads only.
Do not use joint compound on the flare end of
the 1/2”NPT to 3/8”flare adapter. Ensure that
the regulator arrow points in the direction of
gas flow-towards the unit, away from the
supply.
Do not forget to place the installer-supplied
gas valve in an accessible location.
LP GAS HOOK-UP
CONNECTION:1/2”NPT male with 3/8”flare
adapter (included). Use 90º elbow 1/2”NPT
with 3/8”flare (P/N 18523) for side mount
models only when installing on the cart. Use
sealer on 1/2”NPT threads only.
OPERATING PRESSURE: 10.0”W.C.
Side Burner uses the LP regulator from
adjoining grill.
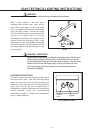
Apply joint compound to the threaded end of
the Side Burner gas inlet and tighten the
adapter to the pipe. Assemble the 24”and 30”
hoses to the 3/8” flare tee, as shown in Fig.04.
Tighten the regulator hose to the remaining
fitting of the 3/8”flare tee.
Open Top
Manifold
Bottom of
131 &132 Burner
1/2" Coupling
1/2" Nipple
1/2" NPT to 3/8"
Flare Adapter
Regulator
To Gas Supply
1/2" Nipple
FIG.03
FIG.04


