


Analog Applications
®
3376 User Manual
8
Section 2
376
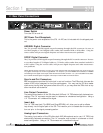
• Turn off all equipment before making any connections.
• Install the 376 in your rack with the provided rack screws. It is essential that when the 376
is being mounted in a rack mounting enclosure, the unit should be positioned with enough
room (at least 1U of space above the unit and 1U of space at the below the unit) to allow
proper ventilation. The 376 should not be mounted above or below anything that generates
excessive heat. Ambient temperatures should not exceed 113
0
F (45
0
C) when equipment is in
use. Although the unit is shielded against radio frequency and electromagnetic interference,
extremely high fields of RF and EMI should be avoided where possible.
• Make audio connections via XLR, 1/4” TRS, or 1/4” TS plugs.
With the flexibility of the 376, various connection options are available. For input con-
nection, use the XLR Microphone, 1/4” line or 1/4” instrument (front panel) inputs. For
analog output connections, use either XLR or 1/4” Line output. The use of more than
one connector at a time for the output section, could unbalance balanced lines, cause
phase cancellations, short a conductor to ground, or cause damage to other equipment
connected to the 376.
• Apply power to the 376. Connect the AC power cord to the AC power receptacle on the back
of the unit. Route the AC power cord to a convenient power outlet away from audio lines.
The unit may be turned on and off from the rear panel power switch or from a master equip-
ment power switch.
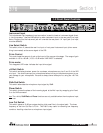
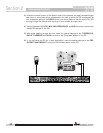
1). Connect your mic cable to the Mic input of the 376
NOTE: If you are using a mic with a separate power supply, such as a tube microphone, make sure that
you are not sending two sources of +48V phantom power to the mic. Use the +48V from the mic’s
power supply. Use the +48V Phantom Power switch on the 376 for all other microphones which
require phantom power.
2). Set the front panel of the 376 to the desired settings, including phantom power, 20 dB pad,
phase, etc. Connect the line output of the 376 to the console’s LINE INPUT, and ensure that
the console’s input selection switch is set to LINE, and the console’s gain control is set
appropriately low.
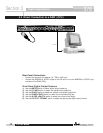
2.2 Connection to a Mixing Console
2.1 Basic Analog Connection of the 376