


3
PAIRING
To make installation easier
it is recommended to pair
units ‘A’ and ‘B’ before
mounting.
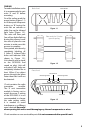
On a at surface push the
power button (Figure 1-1)
on ‘A’ then push the power
button on ‘B’. Laying the
units at on counter or
table, line up the infrared
light holes (Figure 1-2).
The units will then pair.
You will see lights ashing
during this process. Leave
the units in place for one
minute to make sure this
process is complete.
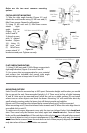
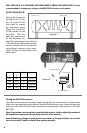
Once paired, test them by
completely blocking all
3 holes (2 infrared light
holes and indicator hole
shown in Figure 1-3).
Unit should send a signal
to the DCR-2500 and
sound an alert. Unit will
only alert if all 3 holes are
completely blocked for at
least 100ms. If an object
passes through the beam
faster than that it will not
be detected.
‘A’ unit contains the radio
transmitter module.
The ‘A’ unit transmitter
module is factory set to
match the zone 2 setting
of the DCR-2500. It is not
recommended to change
the code setting unless
it is needed to avoid
interference or a dierent
zone is desired. Be careful
when opening this unit to avoid damaging any internal components or wires.
‘B’ unit contains no user serviceable parts. It is not recommended to open this unit.
Figure 1-3
Infrared Light Hole Infrared Light Hole
Indicator Hole
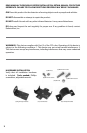
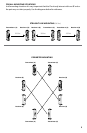
Solar PanelLevel
Front of unit
Power Button
Screws
Screws
Back of unit
Figure 1-1
Figure 1-2
Place units 6 to 12 inches
apart for pairing