


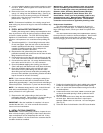
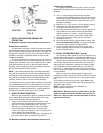

L.
START UP THE APPLIANCE
1) Double check to see that all of the connections are secure.
2) Open the feedwater tapping valve and check the appliance
for leaks. If any leaks are detected, close the valve and
correct the problem before proceeding.
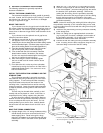
NOTE: If a leak occurs at a "Push In" plastic fitting, then
refer to Fig. 6.
3) Open the storage tank valve and lift the faucet handle until
a steady stream of water flows. Close the faucet, wait at
least 5 minutes and carefully check for leaks. Correct
them as necessary.
4) Plug in the appliance transformer.
NOTE: When the appliance is first turned on, water may
intermittently "spurt" from the air gap opening at the side of
the faucet. This is perfectly normal, and is caused by air
trapped in the system. This will usually disappear within a
short time.
M. FLUSH THE APPLIANCE OF THE PRESERVATIVE
AND CHECK THE OPERATION
1) With the tank valve closed (the tank should still contain the
sanitizing solution at this point), open the faucet (set the
faucet handle in the "up" position) and feedwater valve.
Water should begin to drip from the faucet within several
minutes. Continue to flush the system for 1 hour. Water
will steadily drip from the faucet at this time. During this
procedure, the tank is being intentionally bypassed in
order to thoroughly sanitize the tank and also flush the
membrane of any preservatives.
2) After flushing for 1 hour, shut off the faucet. Open the tank
valve, lift the faucet handle again and allow the tank to
completely empty. When the tank is empty, the faucet will
drip steadily. Measure and record the rate at which water
drips from the faucet. Use a graduated cylinder (in
milliliters) and a watch with a second hand to calculate the
approximate production in gallons per day (milliliters per
minute x 0.38=gpd). Proceed to check the reject flow by
disconnecting the tubing at the drain connection and
measuring the drip rate as outlined above. The ratio
should be a minimum of 2.5 (reject) to 1 (product).
Repeat every 5 minutes until the rate is constant. When
the rate is constant, the tank is empty.
3)
Allow the system to operate in this condition overnight (or
24 hours) to ensure water purity.
4) Close the faucet and reinspect the appliance for leaks.
Allow the tank to fill completely (it will take approximately
4 hours), then drain the tank again.
The water should be
discarded because it may contain some preservative/
disinfectant solution.
5)
The appliance should be ready to use as soon as the tank
refills. If any objectionable taste is noticed after the
second tankful is drained, instruct the customer to wait
and drain the tank the following day. Only at this time
should an icemaker be turned on if one is connected to
the appliance.
NOTE: If an optional percent rejection (PR) monitor is used
and the red light is on, service is required. Several tankfuls of
water may have to be used to completely flush the excess TDS
from the new carbon postfilter before a green light will show.
N. CLEAN UP, PAPERWORK AND CUSTOMER
ORIENTATION
1) Clean up the work area thoroughly.
2) Fill out the warranty card and return it.
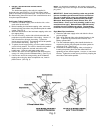
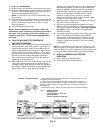
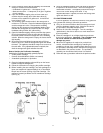
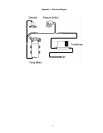
This product is outfitted with user friendly ‘Push In’ connectors. Proper use of the
connectors is shown in the diagrams.
It is most important that the tubing selected for use with these connectors be of
high quality, exact size and roundness, and with no surface nicks or scratches. If it is
necessary to cut the tubing, use a plastic tubing cutter or sharp razor knife. Make a
clean square cut.
Should a leak occur at a ‘Push-In’ connector, the cause is usually defective tubing.
To Fix: •
Relieve pressure
• Release tubing
• Cut off at least 1/4” from end.
• Reattach tubing
• Confirm connection is leak free.
‘Push-In’ Tubing Connector
Fig. 6
9