


C.
REPLACING THE RO MEMBRANE CARTRIDGE
The life of the RO membrane cartridge depends on the
local water conditions and proper maintenance, e.g., regular fil-
ter changes. Under typical conditions, the RO membrane life
ranges from 18-36 months. Unlike the filter cartridges, the RO
membrane cartridge life is not determined by the amount of
water used because of its self-cleaning feature.
When to Replace the RO Membrane Cartridge
• As determined by a built-in percent rejection (PR) monitor:
The monitor is factory preset so that a green light will be
displayed when the water quality is good, and a red or
yellow light indicates that cartridge replacement may be
necessary. If a red or yellow light is displayed, the faucet
should be opened and the storage tank trained. After it
has refilled, check the water quality again. If a red or yellow
light is still displayed, the membrane should be replaced.
• If a PR monitor is not used, your dealer or supplier will
offer a bi-annual testing service.
How to Replace the RO Membrane Cartridge
1) Close the feedwater tapping valve. Unplug the transformer.
Lift up on the faucet handle to drain the tank. Wait five (5)
minutes for the purification assembly to completely
depressurize.
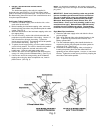
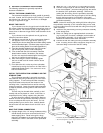
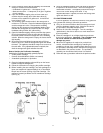
2) Make sure that there is some slack in the red SFC tubing
connected to the fitting at the bottom of the RO membrane
cartridge. Twist the cartridge 1/4 turn clockwise so that
the tubing connection is accessible. (See Fig. 8)
3) Remove the red SFC tubing by depressing the small gray
collet and pulling the tubing away from the fitting.
Note: It is advisable to check the end of the red SFC tubing
for nicks or scratches. If any are observed, cut off 1/4" from
the end of the tubing with a sharp razor knife.
4) Firmly pull the cartridge away from the head. (It may be
necessary to twist the cartridge slightly from side to side.)
5) Remove the new RO membrane cartridge from its sanitary
sealed wrapper. (Double check to see that it is the correct
replacement by comparing the labels.) Rinse it with tap
water and dry it off.
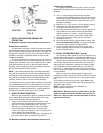
6) Remove the white plug from the fitting at the bottom of the
cartridge by pushing in the small gray collet and pulling out
the plug.
7) Remove the red plastic cap from the top of the cartridge.
8) Using tap water, food grade silicone lubricant or glycerin,
wet the O-ring seals to make cartridge insertion easier.
9) Reconnect the red SFC reject tubing by inserting it into the
fitting at the bottom of the new RO membrane cartridge as
far as it will go. Line up the cartridge ears, insert the
cartridge and push it into the head until it is fully seated.
Twist the cartridge 1/4 turn counterclockwise to lock it
into place.
10) Open the feedwater tapping valve, plug in the transformer
and carefully check for leaks. Carefully inspect the fitting
at the bottom of the new RO membrane cartridge.
11) Follow the sanitizing procedure for the storage tank and
the purification assembly outlined below.
D.
SANITIZING THE RO APPLIANCE
To assure the highest quality water from your Water Factory
Systems RO Drinking Water Appliance, it is important to rou-
tinely sanitize both the storage tank and the purification assem
-
bly.
IMPORTANT: These procedures are only intended to be
part of a routine maintenance program only and are not
designed to sanitize systems that have become highly
contaminated from misuse.
When to Sanitize the Storage Tank
•
Upon start-up as described in the beginning of this manual.
•
After any servicing or routine maintenance which involves
the RO membrane cartridge, postfilter cartridge(s),
storage tank, or faucet.
When to Sanitize the Purification Assembly
•
After any servicing or routine maintenance which involves
the prefilter cartridge or the RO membrane cartridge.
• After any extended period of non-use (over 30 days)
unless the cartridges are stored inside a sealed plastic
bag in the refrigerator.
How to Sanitize the Storage Tank
Sanitizing the storage tank generally requires:
•
The Water Factory Tank Sanitizing Unit (P/N 50-011) or
an equivalent device such as an empty filter housing with
fittings and tubing.
•
Common household bleach (5.25% non-scented).
•
A measuring spoon or a 0-10 ml graduated cylinder.
1)
Close the feedwater tapping valve, unplug the transformer,
and lift up on the faucet handle to empty the water in the
storage tank. It should feel light when empty.
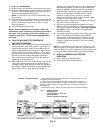
2)
Shut off the faucet and close the valve at the top of tank.
Disconnect the 3/8" yellow tubing from the back for the
purification assembly. (Refer to Fig. 6 on the use of the
special "Push-In" connectors.) Remove the tank from its
location and drain it into the sink by turning it upside down
and opening the valve. Make sure that the outlet fitting is
pointing away from your face and into the sink.
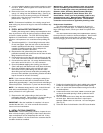
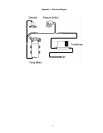
3)
Make sure that the feedwater tapping valve is completely
closed and disconnect the 1/4" orange feedwater tubing
from the purification assembly. Connect the end of the
feedwater tubing to the sanitizing device. Connect an
extra length of 1/4" tubing to the other end of the sanitizing
device. Using the 3/8" x 1/4" union connector, connect the
3/8" yellow tubing from the tank valve fitting to the extra
piece of 1/4" tubing. (See Fig. 8)
13