


Thermostats Crestron CHV-TSTAT and CHV-THSTAT
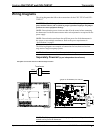
Quick Installation Reference
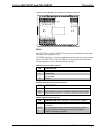
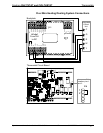
1. Select a suitable location and run the connecting wires from the heating/cooling system and the Cresnet system.
Refer to page 5 for a description of the thermostat connectors.
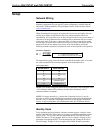
Refer to page 7 for Network wiring details.
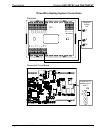
Use the appropriate wiring diagram:
• Heating or Cooling System Powered (Refer to page 9).
• Separately Powered (Refer to page 9).
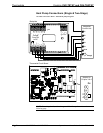
• Three Wire Heat Only with Fan (Refer to page 10).
• Five Wire Heat/Cool Systems (Refer to page 11)
• Single Stage and Two Stage Heat Pump (Refer to page 12).
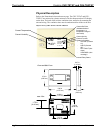
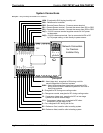
2. Separate the thermostat from the backplate to expose the connections and mounting holes.
3. Mount the thermostat backplate (60 inches above the finished floor) directly to the wall with wall anchors (not
provided) and screws (not provided) or to a single-gang box (not provided) mounted horizontally, and connect
the wiring. Refer to page 14 for detailed mounting instructions and page 8 for detailed connector information. If
using a five-sided box, fill with insulation material to minimize wall air ingress.
4. Install the thermostat on the backplate (Refer to page 14).
5. Setup the thermostat (Refer to page 16).
6. Configure the thermostat (Refer to Operating the Thermostat on page 21).
ii • Thermostats: CHV-TSTAT and CHV-THSTAT Operations and Installation Guide – DOC. 8163A