


Instalaation
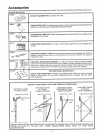
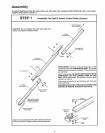
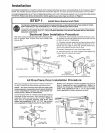
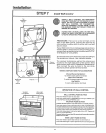
Completed installations of header bracket, door bracket with plate and door arm (depending on door type) are shown
below.. The header bracket supports the front end of the Tee rail. The door bracket connects door arm to troltey,
IT IS RECOMMENDED THATTH E OPENER BE INSTALLED 7 FEETOR MOREABOVE THE FLOOR WHERE SPACE
PERMITS. Follow only those instructions which apply to your door type as shown on Page 5.
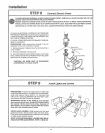
STEP 1
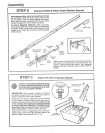
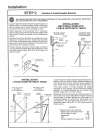
Install Door Bracket and Plate
TO PREVENT DAMAGE TO LIGHTWEIGHTGARAGE DOORS, ALWAYSREINFORCE THE INSIDE OF DOOR--
BOTH VERTICALLY AND HORIZONTALLYMWITH 2x4 BOARDS OR ANGLE IRON.
Horizontal brace should be at least 6 feet tong Verticat brace should cover height of top panel. Reinforcement
hardware is not supplied (See No t Below.) FASTEN SECURELY AS SHOWN BEFORE INSTALLING DOOR
BRACKET AND PLATE_
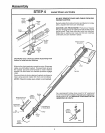
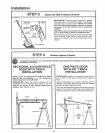
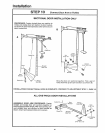
Sectional Door installation Procedure
With door closed, locate and markthe vertical center-
line of garage door. Extend line onto header wail
above door.
Header
:kel
L
Header
Wall
I
Door Bracket &
P{ate Assy
SECTIONAL DOOR
Door
Arm
1. Assemble door bracket and plate as shown Cen-
ter bracket on vertical guideline (or up to one foot left
or right of center if necessary)
2o Position bracket assembly on face of door within
the following limits: A. Top edge of bracket 2" to 4"
below the top edge of door B. Directly below any
structural support across top of door.
Placement depends on your particular needs
3. Mark and drill 5/! 6"TOP and BOTTOM fastening
holes Secure bracket as shown
Vertical
Center--
Line
Carriage Bolt ._
5/16"-18x2-1/2"
TOp of Door
Board for Inside Edge
Lightweight Doors of Door or
Reinforcement Board
Door
Bracket
Door Bracket
Plate
Lock
Washer
5/16"
Nut
5/16"-18
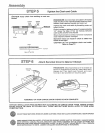
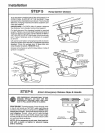
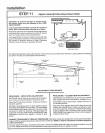
All One-Piece Door installation Procedure
With door closed, locate and mark vertical centerline
of door,, Extend line onto header wall above door
NOTE: The door bracket has left and right side
fastening holes. Assemble door bracket and plate
if your installation requires top and bottom fas-
tening holes. (Refer to illustration).
Center bracket (with or without plate as required) on
top edge of door as shown Mark and dri]I two 5/16"
fastening holes and secure door bracket. NOTE: if
door has no exposed framing, drill 3/16" pilot
holes and substitute 5/16" x 1-1/2" lag screws
(not supplied) to fasten bracket to top of door°
Lock Washer
5/16"
Door,
5t16"-!8
Bracket
Plate
Top Edge
of Door
(Outside) - (Optiona!)
Carriage Boil
5/16"-t8x2-1/2'"
NOTE: Door bracket may be installed on face of
door if required for your installation. (Refer to
dotted line drawing). HOWEVER, drill 3/16"pilot
holes and substitute 5/16" x t-1/2" lag screws
(not supplied) to fasten bracket to door_
Face of DOOr
installation
Vertical
Center
Line
ONE PIECE DOOR
Door Brackel
Plate
(Optional)
lO