


13.Inserthoseendwithlocking-
nutintoinletof tankandtight-
ennut.Donotover-tighten.
14.Attachtheextensionwandsto
theaccessoryendofthehose.
15.Attachoneofthecleaning
accessories(dependingon
yourcleaningrequirements)
ontotheextensionwands.
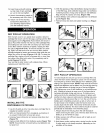
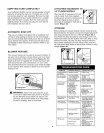
5.Withtheopeningoftheinletdeflectorfacingthebottom
of thefilterbag,slidecollectionbagcollaroverdeflector,
matchingnotchesof bagcollarto tabsoninletdeflector.
Bagwillonlyfitproperlyoneway.(Figure15b)
6.Slidedeflectorwithcollectionbagattachedintodeflector
guide(Figure15c)
7.Reinserthoseintoinletandtightenlocking-nut.(Figure
15d)
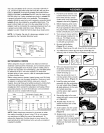
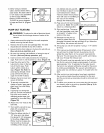
DRY PICK-UP OPERATION
With the tank cover in an upside down position, slide the
cartridge filter down over the lid cage, pushing until the filter
seals against cover (Figure 8). Foam sleeve will remain in
place. Place filter retainer into the top of the cartridge filter,
and holding the tank cover with one hand, turn the handle
on the filter retainer clockwise to tighten, locking the filter
into place (Figures 9 & 10). To remove the filter for clean-
ing, again hold the tank cover and turn the filter retainer
counterclockwise to loosen and remove, then slide the car-
tridge filter off the lid cage (Figures 11 & 12}. To clean the
cartridge filter, shake or brush off excess dirt or rinse (from
the inside of the filter) with water. Dry completely and re-
install (Figures 13 & 14).
Your vac filter is color coded with a black stripe. When
replacing, just match the color.
F"
TIGHTEN
INSTALLING THE
DISPOSABLE FILTER BAG
1. Use for dry pick-up only. Use only when cartridge filter is
installed on wet/dry vacuum.
2. With cord disconnected from receptacle, pull latches in
an outward motion and remove tank cover.
3. Unscrew hose locking-nut and remove hose from inlet.
(Figure 15)
4. Remove inlet deflector from deflector guide. (Figure 15a)
NOTE: Hose must be removed before inlet deflector can
be taken out.
WET PICK-UP OPERATION
For best results for wet pick-up remove cartridge filter and
utilize the foam sleeve (already in place over the lid cage).
For wet pick-up remove inlet deflector from deflector guide
sliding in an upward motion. NOTE: Hose must be removed
before inlet deflector can be taken out. Be sure the opening
of the inlet deflector is facing the top of the tank (Figure
16). Misting may occur if inlet deflector is not inserted prop-
erly. Misting in exhaust air may occur if the foam sleeve
becomes saturated during wet pick-up. If misting occurs,
remove and dry the saturated foam sleeve or replace with
another dry foam sleeve to eliminate the misting and possi-
ble dripping of liquid around the lid. Turn the unit off imme-
diately upon completing a wet pick-up job, or when tank is
full and ready to be emptied, raise the hose to drain any
excess liquid into the tank. The interior of the tank should
be periodically cleaned. The foam sleeve should be cleaned
periodically as described in the following steps:
1. Always disconnect the plug from the wall receptacle
before removing the tank cover. Remove foam sleeve by
sliding it up and off the lid cage.
2. Shake excess dust off foam sleeve with a rapid up and
down movement.
3. Hold sleeve under running water, rinsing from the inside.
A water wash is not always required, depending on the
condition of the sleeve.