


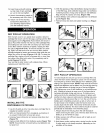
This vacuum cleaner is for use on a nominal 120-volt cir-
cuit, and has a grounded plug that looks like the plug illus-
trated in sketch A. A temporary _dapter that looks like the
adapter illustrated in sketches B and C may be used to con-
nect this plug to a 2-pole receptacle as shown in sketch B if
a properly grounded outlet is not available. The temporary
adapter should be used only until a properly grounded outlet
(sketch A) can be installed by a qualified electrician. The
green colored rigid ear, lug or the like extending from the
adapter must be connected to a permanent ground such as
a properly grounded outlet box cover. Whenever the
adapter is used, it must be held in place by a metal screw.
NOTE: In Canada, the use of a temporary adapter is not
permitted by the Canadian Electrical code.
GROUNDING METHODS
_ _ (_'MOUTLET _GROUNDED _ A _ApTIERETAL 1_% ft._
GROUNDING GROUNDED
PIN OUTLET BOX
(A) (B] _¢)
EXTENSION CORDS
When using the vacuum cleaner at a distance where an
extension cord becomes necessary, a 3-conductor ground-
ing cord of adequate size must be used for safety, and to
prevent loss of power and overheating. Use the table below
to determine A.W.G. wire size required. To determine
ampere rating of your vacuum, refer to nameplate {ocated
on rear of motor cover.
Before using vacuum cleaner, inspect power cord for loose
or exposed wires and damaged insulation. Make any need-
ed repairs or replacements before using your vacuum
cleaner. Use only three-wire outdoor extension cords which
have three-prong grounding-type plugs and three-pole
receptacles which accept the extension cord's plug. When
vacuuming liquids, be sure the extension cord connection
does not come in contact with the liquid.
Volts
120V
Ampere Rating
Mere Not More
Than Than
0.. 6
6................... 10
10................. 12
12................. 16
TotalJength ofcordin _et
25 50 100 150
AWG
18 16 16 14
18 16 14 12
16 16 14 !2
14 12 Notrecommended
NOTE: Static shocks are common in dry areas or when
the relative humidity of the air is low. This is only tempo-
rary and does not affect the use of the appliance. To
reduce the frequency of static shocks in your home, the
best remedy is to add moisture to the air with a console or
installed humidifier.
1.
2.
.
4,
5,
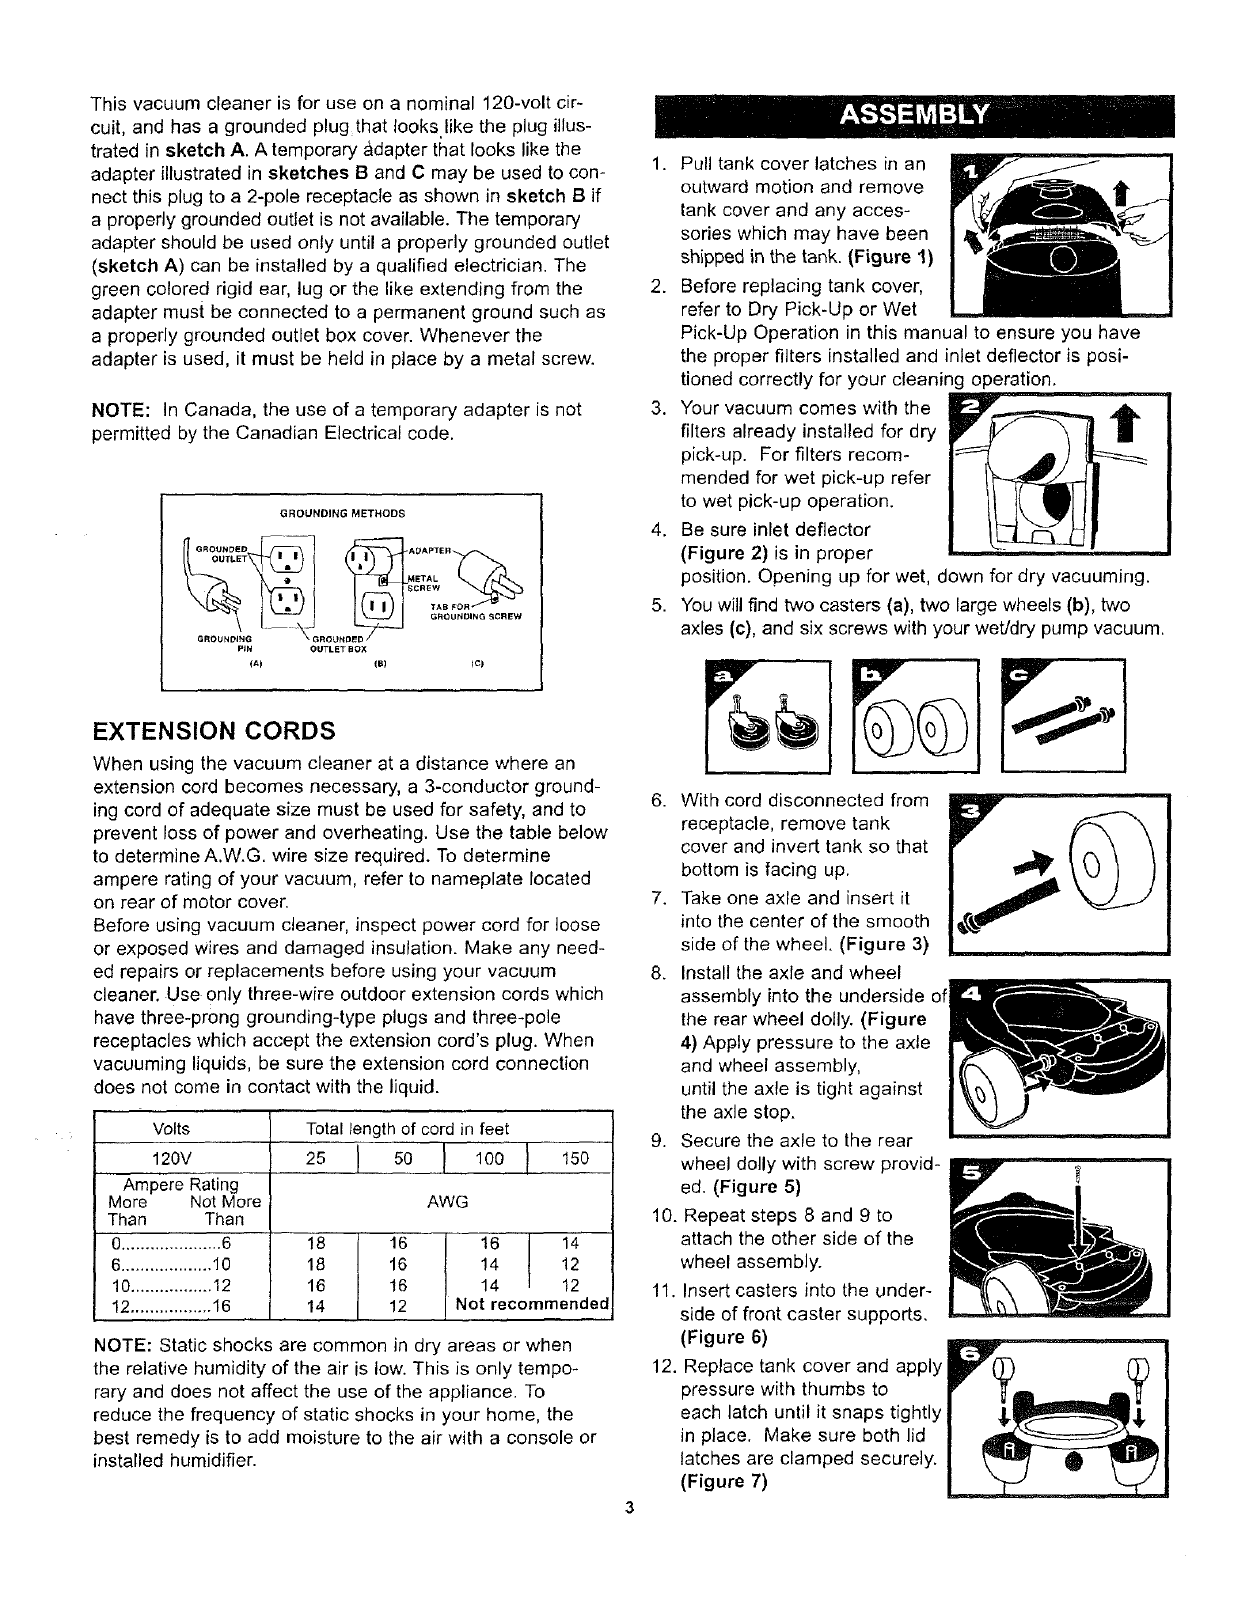
Pull tank cover latches in an
outward motion and remove
tank cover and any acces-
sories which may have been
shipped in the tank. (Figure 1)
Before replacing tank cover,
refer to Dry Pick-Up or Wet
Pick-Up Operation in this manual to ensure you have
the proper filters installed and inlet deflector is posi-
tioned correctly for your cleaning operation,
Your vacuum comes with the
filters already installed for dry
pick-up. For filters recom-
mended for wet pick-up refer
to wet pick-up operation.
Be sure inlet deflector
(Figure 2) is in proper
position. Opening up for wet, down for dry vacuuming.
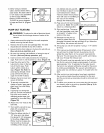
You will find two casters (a), two large wheels (b), two
axles (c), and six screws with your wet/dry pump vacuum.
6. With cord disconnected from
receptacle, remove tank
cover and invert tank so that
bottom is facing up.
7. Take one axle and insert it
into the center of the smooth
side of the wheel. (Figure 3)
8. Install the axle and wheel
assembly into the underside of
the rear wheel dolly. (Figure
4) Apply pressure to the axle
and wheel assembly,
until the axle is tight against
the axle stop.
9. Secure the axle to the rear
wheel dolly with screw provid-
ed. (Figure 5)
10. Repeat steps 8 and 9 to
attach the other side of the
wheel assembly.
11. Insert casters into the under-
side of front caster supports,
(Figure 6)
12. Replace tank cover and apply
pressure with thumbs to
each latch until it snaps tightly
in place. Make sure both lid
latches are clamped securely.
(Figure 7)