


installation
i,! ,i ii, iiii i, ,i,,i i,
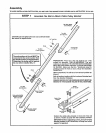
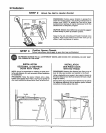
STEP 1
iiii1,11 i i i i , ii iiii...::....... iii iiii L ii iiiiiii ,11 iiiii
Position and Instafl Header Bracket
installation procedures vary according to garage door types. Follow only those instruc-
tions which apply to your door as tllustratedo
i i iii i IL iii i .... :=
THE HEADER BRACKET MUST BE RIGIDLY FASTENED TO THE HEADER WALL. REINFORCE THE WALL
WiTH 2x4 IF NECESSARY. FAILURE TO COMPLY MAY RESULT IN IMPROPER OPERATION OF SAFETY
REVERSE SYSTEM (SEE PAGE 18)+
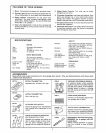
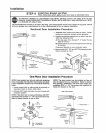
1o With the door closed, locate and mark the vertical
centerline of garage door. Extend line onto header wall
above the door.
2. Locate height for header bracket by opening door to
highest point of travel as shown. Draw an intersecting
horizontal line on header wail 2" above high point. This
height provides travel clearance for top edge of door.
NOTE: When the headroom is not sufficient for 2"
clearance, the bottom edge of bracket may be placed
parallel to the high point of travel
Door Clearance Brackets ere designed for low
headroom installations (page 4). They replace top
brackets and milers on the garage door, thereby
lowering the high point of door travel. Installation
instructions are contained in the accessory carton.
Door
{_ackel . /
i /
I" I ,,_ H_hest
I .F P_nt o!
y "Travel
ii,J, IIIIL, i irlll,lll ijlll ii , iii iiiiii1,1111
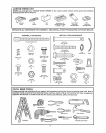
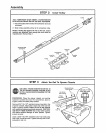
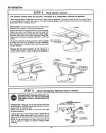
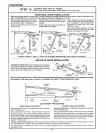
INSTALLATION
1-PIECE DOOR WITHOUT TRACK
ONE PIECE DOOR
..... "NOTRACK
PIVOT HARDWARE
HighestPo{nt
Header of Trey!!
ONE PIECE DOOR
NO TRACK
JAMB HARDWARE
INSTALLATION
SECTIONAL DOOR AND
l-PIECE DOOR WITH TRACK
SECTIONAL DOOR
CURVED TRACK
Ceiling
ONE-PIECEDOOR
HORIZONTALTRACK
JAMB HARbWARE
Header
_cket
Track
3. Position bracket as shown (bottom edge of bracket on
herizortal line). Mark either top and bottom or left and
right bracket holes. Drill 3/16" pilot holes and fasten
bracket.
i ,,,i ,i ii i r i i ir
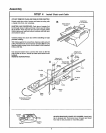
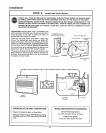
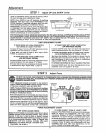
t. Follow instructionsas describedin 1 above.
2. Locateheight for header bracket by opening doot: to
highestpoint oftravelas shown.Measure the distance
from top of door to floor,Subtractactual height of door.
Add 8" tothe remainder.Refer to examplebelow.
NOTE: If total numberof inches exceedsthe height
available in your garage, use the maximum height
possets. On finished ceilings, do not position the
bracket closer than 1/2" from ceiling.
3 Measudng frem top of door draw an intersecting
horizontalline onthe headerwallat determinedheight.
Position the bottom edge of header bracket on the
horizontal line, centeringbracketon verticleline, Mark
either topand bottom or left and rightholes°Drill 3/16"
pilot holes andfasten the bracketwith 5/16"xl-7/8" lag
screws as shown above,
EXAMPLE
Distance from lop of door (at
highest pointof travel) to floor ................. 92"
Actual height of door ........................ 88"
Remainder ................................. 4"
Add ........................................+ 8"
Bracket height on header wall ................ 12"
(Measure UP from top of doer
in closed position.)
i i ii i,i i ,11.,.,, i .
10