


4
ENGLISH
above your porch floor, and your porch floor is 2 feet above
ground level (and you want the ground area covered), your
actual mounting height is considered to be 8 feet.
Step 2: The lens is factory preset in the “L” position, so if your mounting
height is 8 feet or less, then skip to the section titled
“Putting
up your fixture.”
If your mounting height is above 8 feet, then
continue to Step 3.
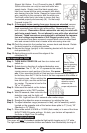
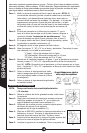
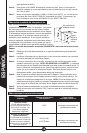
Step 3: On the bottom of your lantern, locate the decorative cap and remove it
by turning counter clockwise (J).
Step 4: Next, remove the lower rotator cap.
Step 5: Notice the “L”, “M”, and “H” marking on both the lens and
the lens holder. To select your desired position, refer to
the chart below.
“L” (low) - Mounting height is 6 feet to 8 feet
“M” (medium) - Mounting height is 8 feet to 10 feet
“H” (high) - Mounting height is 10 feet to 12 feet
Step 6: Based on the measurement in Step 1, turn the lens holder clockwise to
either “L”, “M”, or “H” depending on your
lantern mounting height (K).
NOTE: You
will feel the lens holder and lens click into
place. The “L”, “M”, and “H” represent the
center viewing area on each portion of the
lens.
Step 7: Replace the lower rotator cap (make sure
the hex area of rotator cap fits over hex
turret area).
Step 8: Replace the decorative cap by turning clockwise.
Putting up your fixture
NOTE: Estimated assembly/installation time
• 15 minutes
Step 1: Turn off the power at the main fuse/breaker box.
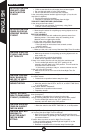
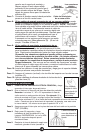
Step 2: Rotate universal mounting bracket arms to an “X”
position with bent bracket arm facing forward (L).
Step 3: Using the screws provided, attach the flat arm of the
mounting bracket to the appropriate screw holes on
the junction box (L).
Step 4: (MDL300 only) Locate the screw-on decorative cap in
the hardware bag. Screw the decorative cap into the
threaded hole on the top of the lantern. Hand tighten.
Step 5: Install decorative bulb(s) and secure lantern top by
hand tightening the ball nut screws.
Step 6: Find the hook located in the hardware bag. Place one end
of the hook through the hole in the mounting
bracket (as shown), then hang the lantern
(upside down) by placing the other end of the
hook through the drain hole located in the bot-
tom of the lanter
n co
v
erplate. This will free up
your hands to wire the fixture (M).
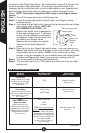
Step 7: Connect the bare copper g
round wire from the
fixture to the house ground wire.
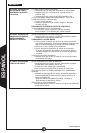
Step 8: If the supply wires coming from your house
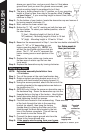
are solid, you can use the Quick-connect™ wire system to attach your
L
M
N
Prewired
quick
connector
Solid
fixture
wire
Solid house
suppl
y wire
Your fixture mounts to
these junction boxes
Round Rectangular Octagonal
(horizontal)
J
K