


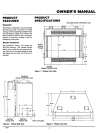
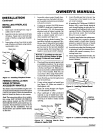


OWNER'S MANUAL
INSTALLATION
I NOTICE: This firebox in combi-
nation with unvented Iogsets are
intended for use as supplemen-
tal heat. Do not Install them as
your primary heat source. If you
have a central heating system,
you may run system's circulat-
ing blower while using unrented
logs. This will help circulate the
heat throughout the house. In the
event of a power outage, you can
use unrented logs as your pri-
mary heat source.
NOTICE: A qua,fled service per-
son must install firebox. Follow
all local codes.
WARNING: Never install the
firebox
• in a bedroom or bathroom
• in a recreational vehicle
• where curtains, furniture, cloth-
ing, or other flammable objects
are less than 42 Inches from the
front, top, or sidesofthefirebox
• In high traffic areas
• in windy or drafty areas
• IL CAUTION: Log heaters In-
stalled inthis firebox create warm
air currents. These currents move
heat to wall surfaces next to fire-
box. Installing firebox next to vl-
nyl or cloth wall coverings or
operating firebox where impuri-
ties In the air (such as tobacco
smoke, aromatic candles, clean-
Ing fluids, oil or kerosene lamps,
etc.) exist, may discolor walls.
IMPORTANT:Vent-free gas log beaters add
moisture to theair.Although this isbeneficial,
installing firebox in rooms without enough
ventilation air may cause mildew to form
fromtoomuch moisture. SeeAirfor Combus-
tion and Ventilation, pages 4 through 6.
IMPORTANT:Makesurethefirebox is level.
If firebox is not level, log set will not work
propedy.
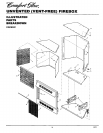
Note: Your Comfort Glow firebox is de-
signed to be used in zero clearance installa-
tions. Wall or framing material can be placed
directly against any exterior surface on the
rear, sides, or top of your firebox, except
where standoff spacers are integrally at-
tached. If standoff spacers are attached to
your firebox, these spacers can be placed
directly against wall or framing materials.
Use the dimensions shown for rough open-
ings to create the easiest installation (see
Built-In Firebox Installation, page 10).
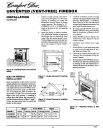
INSTALLATION
CLEARANCES
_i, WARNING: Maintain the mini-
mum clearances. If you can, pro-
vide greater clearances from
floor, ceiling, and adjoining wall.
Carefully follow the instructions below. This
will ensure safe installation.
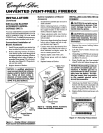
Minimum Wall and Ceiling
Clearances (see Figure 6)
A. Clearances from the side of the fire-
box opening to any combustible wall
should not be less than 16 inches for a
cabinet mantel or 12 inches for a cor-
ner installation.
B.
C.
Clearances from the top of the firebox
opening to the ceiling should not be less
than 42 inches.
When the firebox is installed directly
on carpeting, or other combustible ma-
terial, other than wood flooring, the
firebox should be installed on a metal
or wood panel extending the full width
and depth of the enclosure.
Mantel Clearances for
Conventional Installation
Note: Clearances
are the same if
using optional
cabinet mantel or
builtqn nstallation.
MINIMUM
CLEARANCE
42" Side Wall - 16 "
Ceiling - 42"
Floor - 0"
16"
Face or
Cabinet
Mantel
12"
__ Corner_
Mantel Floor - 0"
Figure 6 -Minimum Clearance to Walland
Ceiling
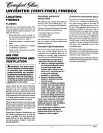
Mantel Clearances for Built-In
Installation
If placing custom mantel above built-in
firebox, you must meet minimum clearance
between mantel shelf and top of firebox
opening.
Note:
All vertical measurements
are from top offireplace
opening to bottom of mantel
shelf. All measurements
ate in ibches
Facing material (above
firebox)may beof
combustible matedal.
includingdecorative
mantel orname_lts.
/
Fi_x
Mantel Shelf
1 • J
Underside of
Mantet
Figure 7 - Minimum Mantel Clearances
for Built-In Installation
If your installation does not meet the above
minimum clearances, you must:
• raise the mantel to an acceptable height,
OR
• remove the mantel.
Continued
10_7S 7