


2-8
Installation and Upgrade Guide for Cisco Unified Videoconferencing 3522 BRI Gateway and 3527 PRI Gateway Release 5.5
OL-14910-01
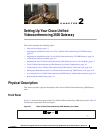
Chapter 2 Setting Up Your Cisco Unified Videoconferencing 3500 Gateway
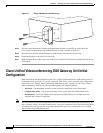
Cisco Unified Videoconferencing 3500 Gateway Unit Initial Configuration
Procedure
Step 1 Connect the supplied terminal cable to the PC terminal.
Step 2 Connect the power cable.
Step 3 Start the terminal emulation application on the PC.
Step 4 Set the communication settings in the terminal emulation application on the PC as follows:
• Baud rate: 9600
• Data bits: 8
• Parity: None
• Stop bits: 1
• Flow control: None
Step 5 Turn on the power to the Cisco Unified Videoconferencing 3500 Gateway unit.
Step 6 After the terminal emulator session starts, press the RST button on the Cisco Unified
Videoconferencing 3500 Gateway unit front panel to reset the module.
A log of the auto-boot events and a VxWorks banner scrolls across the computer monitor.
Note When the Cisco Unified Videoconferencing 3500 Gateway unit is started for the first time, two
VxWorks banners appear. The configuration option appears after the second banner.
Step 7 When the message “Press any key to start configuration” appears on the screen, press any key within 6
seconds.
The network configuration Main menu appears:
Press any Key To start configuration...
Main menu
Enter <N> to configure default network port values
Enter <P> to change the configuration software password
Enter <A> to display advanced configuration menu
Enter <Q> to quit configuration menu and start GW
Caution If you do not press a key before the countdown ends, the device continues its initialization and
you can only configure the device by pressing the RST button on the front panel.
Step 8 At the prompt, type N to configure default network port values and press Enter.
Step 9 At the Enter IP address for default interface prompt, type the IP address you want to assign to the
Cisco Unified Videoconferencing 3500 Gateway unit and press Enter.
Caution Do not use leading zeros in the IP address.
Step 10 At the Enter Default Router IP Address prompt, type the IP address of the router associated with the
segment in which the unit will be installed and press Enter.
Caution Do not use leading zeros in the IP address.
Step 11 At the Enter IP Mask <HEX> for default device prompt, type the subnet mask as follows: