


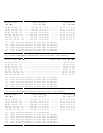
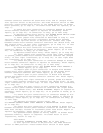

A/C SYSTEM PERFORMANCE TEMPERATURE SPECIFICATIONS (2001 MODELS)
Ambient Temp. F ( C) Center Vent Temp. F ( C)
70-80 (21-27) (1) ...................................... 38-48 (3-9)
70-80 (21-27) (2) ..................................... 40-55 (4-13)
80-90 (27-33) (1) ..................................... 38-55 (3-13)
80-90 (27-33) (2) ..................................... 45-65 (7-18)
90-100 (33-38) (3) .................................... 45-63 (7-17)
90-100 (33-38) (4) ................................... 55-68 (13-20)
100-110 (38-44) (5) .................................. 53-64 (12-18)
100-110 (38-44) (6) .................................. 58-70 (14-21)
(1) - With relative humidity at less than 50 percent.
(2) - With relative humidity at more than 50 percent.
(3) - With relative humidity at less than 40 percent.
(4) - With relative humidity at more than 40 percent.
(5) - With relative humidity at less than 20 percent.
(6) - With relative humidity at more than 20 percent.
DIAGNOSTIC SYSTEM TEST
1) Connect scan tool to Data Link Connector (DLC). DLC is
located under instrument panel, near steering column. If scan tool
powers up, go to next step. If scan tool does not power up, go to
appropriate BODY CONTROL MODULES article in ACCESSORIES & EQUIPMENT.
2) Turn ignition switch to ON position. Attempt to establish
communications with A/C-heater control module, Body Control Module
(BCM) and Powertrain Control Module (PCM). If communications is
establish to all desired modules, go to next step. If communications
is not established to all desired modules, go to appropriate BODY
CONTROL MODULES article in ACCESSORIES & EQUIPMENT.
3) Following scan tool manufacturer’s instructions, select
DISPLAY DTCs function for A/C-heater control module, BCM and PCM. If
any Diagnostic Trouble Codes (DTCs) are displayed, go to next step. If
no DTCs are displayed, perform procedure for appropriate symptom.
4) If scan tool displays any DTCs beginning with "U", go to
appropriate BODY CONTROL MODULES article in ACCESSORIES & EQUIPMENT.
If no DTCs beginning with "U" are displayed, go to next step.
5) If scan tool displays any DTCs beginning with "B", go to
appropriate BODY CONTROL MODULES article in ACCESSORIES & EQUIPMENT.
If no DTCs beginning with "B" are displayed, go to next step.
6) If scan tool displays any DTCs beginning with "P", go to
appropriate SELF-DIAGNOSTICS article in ENGINE PERFORMANCE. If no DTCs
beginning with "P" are displayed, perform procedure for appropriate
symptom.
BLOWER MOTOR ALWAYS ON
2000 Models
1) Perform DIAGNOSTIC SYSTEM TEST. Go to next step.
2) Turn ignition switch to OFF position. Disconnect blower
motor relay. Using test light connected to ground, probe blower motor
relay harness connector terminal A1 (Orange wire). If test light
illuminates, go to next step. If test light does not illuminate, go to
step 4).
3) Repair short to battery voltage in Orange wire between
blower motor relay harness connector terminal A1 and blower motor
switch harness connector C1 terminal "B" located at A/C-heater control
panel. After repair, go to step 9).
4) Using test light connected to ground, probe blower motor