screen to new evaporator. Using appropriate adhesive, install NEW
evaporator core gasket in same position as original. Slide new
evaporator to right until full seated in A/C-heater case.
2) Apply sealer (not epoxy) between evaporator and evaporator
upper and lower case. Using epoxy, glue perforated section of heater
and A/C evaporator case to A/C-heater case. After epoxy dries, use
thumb to grade sealant on inside and outside to ensure a water-tight
seal.
3) Slide temperature valve case upward into position until
upper clip engages. Engage snap on left edge of A/C-heater case to
distribution case. Refill cooling system. Evacuate and charge A/C
system.
HEATER CORE
CAUTION: DO NOT use excessive force to remove heater hoses from heater
core pipes. Heater core can be damaged.
Removal
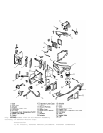
Drain cooling system. Remove heater hoses from heater core
pipes. Open glove box. Push sides of glove box and remove glove box.
Remove heater module bolts and cover. Remove heater core bolt, heater
core clamp and heater core.
Installation
To install, reverse removal procedure. Lubricate heater
pipes. Verify seal is installed correctly by observing seal from
inside engine compartment. If seal leaks, apply sealer between heater
core pipes and evaporator housing. Refill cooling system.
ACCUMULATOR
Removal
Disconnect negative battery cable. Discharge A/C system,
using approved refrigerant recovery/recycling equipment. Remove
accumulator tube fitting at accumulator. Remove accumulator tube, and
discard "O" ring. Remove evaporator tube fitting at accumulator.
Remove accumulator from bracket, and discard "O" ring.
Installation
1) If accumulator is being replaced, drain and measure amount
of refrigerant oil in old accumulator. Add drained amount plus one
fluid ounce of new refrigerant oil to new accumulator.
2) Clean all fittings with mineral-base refrigerant oil.
Lightly coat all seals with mineral-base refrigerant oil before
assembling. Evacuate and charge A/C system.
ORIFICE (EXPANSION) TUBE
CAUTION: If vehicle is equipped with a pressure switch mounted near
orifice tube location, remove switch before heating inlet
tube to prevent damage to switch.
Removal & Installation
1) Discharge A/C system, using approved refrigerant
recovery/recycling equipment. Remove evaporator tube. See
EVAPORATOR TUBE. Using needle-nose pliers or orifice tube remover,
remove orifice tube from evaporator tube.
2) If removal of orifice tube is difficult, remove as much of
the impacted residue as possible. Using a heat gun, apply heat 1/4" (7
mm) from dimples on inlet pipe. DO NOT overheat evaporator tube.
3) To install, reverse removal procedure. Lubricate new "O"
ring with clean refrigerant oil prior to installation. DO NOT soak "O"


