


1) Perform DIAGNOSTIC SYSTEM TEST. Go to next step.
2) Turn ignition switch to ON position. Set mode switch to
VENT position. Turn blower switch to each speed position. If blower
motor operates normally, go to next step. If blower motor
malfunctions, go to step 4).
3) Place blower motor switch at maximum speed position. Place
mode switch in each position. If blower operates in each switch
position, problem is intermittent. Check for faulty wiring, poor
connections or damaged components. Repair as necessary. After repair,
go to step 24). If no problem is found, go to step 18).
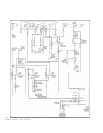
4) Turn ignition switch to OFF position. Disconnect blower
motor harness connector. Turn ignition switch to ON position. Using
test light connected to ground, probe blower motor harness connector
terminal "B" (Purple wire). Place blower motor switch in each speed
position. If test light does not illuminate in each speed position, go
to next step. If test light illuminates in all speed positions, go to
step 16).
5) If test light does not illuminate in maximum speed
position, go to next step. If test light illuminates in maximum speed
position, go to step 10).
6) Turn ignition switch to OFF position. Disconnect blower
motor relay. Turn ignition switch to ON position. Using test light
connected to ground, probe blower motor relay harness connector
terminal A2 (Red wire). If test light illuminates, go to next step. If
test light does not illuminate, go to step 19).
7) Set blower motor switch in maximum speed position. Using
test light connected to ground, probe blower motor relay harness
connector terminal A1 (Orange wire). If test light does not
illuminate, go to next step. If test light illuminates, go to step 9).
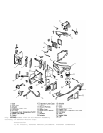
8) Check Orange wire between blower motor relay harness
connector terminal A1 and blower motor switch harness connector C1
terminal "B" located at A/C-heater control panel for open or high
resistance. Repair Orange wire as necessary. After repair, go to step
24). If wire is okay, go to step 14).
9) Check Black wire for open or high resistance between
blower motor relay harness connector terminal C2 and ground. Repair
Black wire as necessary. After repair, go to step 24). If wire is
okay, go to step 15).
10) Turn ignition switch to OFF position. Disconnect blower
motor relay. Turn ignition switch to ON position. Using test light
connected to ground, probe blower motor relay harness connector
terminal B2 (Dark Blue wire). Alternately set blower motor switch in
minimum, M1 (medium-low) and M2 (medium-high) speed positions. If test
light illuminates in each speed position, go to step 15). If test
light does not illuminate, go to next step.
11) Check Dark Blue wire between blower motor relay harness
connector terminal B2 and blower motor resistor harness connector
terminal "C" for short to ground, open or high resistance. Repair Dark
Blue wire as necessary. After repair, go to step 24). If wire is okay,
go to next step.
12) Turn ignition switch to OFF position. Disconnect blower
motor resistor harness connector. Turn ignition switch to ON position.
Set mode switch in VENT position. Using test light connected to
ground, individually probe blower motor resistor harness connector
terminals "A" (Tan wire), "B" (Yellow wire) and "D" (Light Blue wire).
See WIRING DIAGRAMS. Set blower motor switch in speed position
corresponding to wire being tested. If test light does not illuminate
at any switch position, go to next step. If test light illuminates at
each switch position, go to step 17).
13) Check suspect blower motor control circuit identified in
previous step for open or high resistance. Repair suspect wire as
necessary. After repair, go to step 24). If wire is okay, go to step
18).