


4
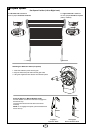
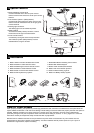
Installation steps
6
FOR RIGHT HAND INSTALLATIONS (REFER SECTION 5, page 3)
1. Ensure that the opener position jumper (wire connector) is in place (refer
section 5, page 3).
2. Place the opener in manual release mode (refer section 5, page 3).
3. Open the roller door fully. For safety, tie a rope around the door.
4. Ensure that the U-bolt on the left hand side of the door is
secure.
5. Mark the position of the door shaft on the right hand door bracket.
6. Carefully remove the U-bolt on the right hand side, checking that
the spring tension inside the roller door is not being released.
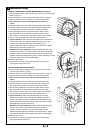
7. You will need assistance for the following steps. Slide or lift the
door shaft clear of the door bracket supporting the door weight
with a ladder or similar device. Then slip the opener over the shaft.
8. The forks should engage either side of the support spoke.
9. Typical installation: Place the door shaft back onto the door bracket
in the position that it was originally. Clamp the opener to the door
shaft with the supplied bracket plate, 8mm bolts and nuts.
Tighten sufficiently to fasten the opener firmly to the shaft i.e. 25Nm-
28Nm. Replace U-bolt and secure firmly.
Minimum side room installation: Place the opener and door shaft
onto the door bracket in the position that the door shaft was originally.
Clamp the opener to the door shaft though the door bracket with the
supplied bracket plate, 8mm bolts and nuts. Tighten sufficiently to fasten
the opener firmly to the shaft i.e. 25Nm-28Nm.
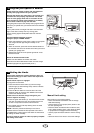
10. Remove rope if used.
11. Plug opener into nearby power point and switch on power point,
opener lights should now turn on.
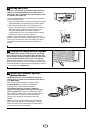
FOR LEFT HAND SIDE INSTALLATIONS
1. Ensure that the opener position jumper (wire connector) has been
removed (refer section 5, page 3).
2. Place the opener in manual release mode (refer section 5, page 3).
3. Open the roller door fully. For safety, tie a rope around the door.
4. Ensure that the U-bolt on the right hand side of the door is
secure.
5. Mark the position of the door shaft on the left hand wall bracket
6. Carefully remove the U-bolt on the left hand side, checking that
the spring tension inside the roller door is not being released.
7. You will need assistance for the following steps. Slide or lift the
door shaft clear of the door bracket supporting the door weight
with a ladder or similar device. Then slip the opener over the shaft.
8. The forks should engage either side of the support spoke.
9. Typical installation: Place the door shaft back onto the door
bracket in the position that it was originally. Clamp the opener to
the door shaft with the supplied bracket plate, 8mm bolts and nuts.
Tighten sufficiently to fasten the opener firmly to the shaft i.e. 25Nm-
28Nm.Replace U-bolt and secure firmly.
Minimum side room installation: Place the opener and door shaft
onto the door bracket in the position that the door shaft was
originally. Clamp the opener to the door shaft though the door
bracket with the supplied bracket plate, 8mm bolts and nuts. Tighten
sufficiently to fasten the opener firmly to the shaft i.e. 25Nm-28Nm.
12. Remove rope if used.
13. Plug opener into nearby power point and switch on power point,
opener lights should now turn on.