


- 8 -
GENERAL INFORMATION ON ASSEMBLING
THE VENT PIPES
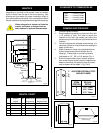
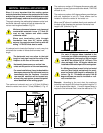
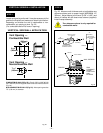
Join pipes and secure joints with three (3) sheetmetal
screws. (See Fig. 10) Wipe off excess sealant.
CRIMPED END PIPES
Before joining elbows and pipes apply a bead of high
temperature sealant to crimped end of elbow or pipe.
(Fig. 10).
Fig. 10
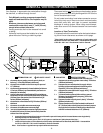
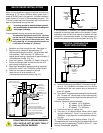
CANADIAN INSTALLATIONS:
The venting system must be installed in accordance with
the current CAN/CGA-B149 (.1 or .2) installation code.
U.S.A. INSTALLATIONS:
The venting system must conform with local codes and/or
the current National Fuel Gas Code, ANSI Z223.1.
Only venting components manufactured by The CFM
Majestics Products Company may be used.
When using twist lock pipe it is not necessary to use
sealant at the twist lock joints.
The only areas of the venting that need to be sealed with
high temperature silicone sealant are the collars on the
fireplace and termination, and the sliding joint of any
telescopic vent pipes used in the system.
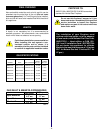
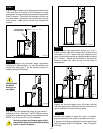
To join the twist lock pipes together, simply align the
beads of the male end with the grooves of the female
end, then while bringing the pipes together, twist the
pipe until the flange on the female end contacts the
external flange on the male end.
TWIST LOCK PIPES
Fig. 11
It is recommended that you secure the joints with 3
sheet metal screws however this is not mandatory with
twist lock pipe.
To make it easier to assemble the joints we suggest
putting a lubricant (Vaseline or similar) on the male end
of the twist lock pipe.
TWIST LOCK PIPE JOINT
Screw Holes
BEAD LOCATION
1" From crimped end of pipe
1''
Screw Holes