


23
Dutchwest Seneca
2006063
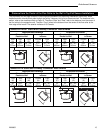
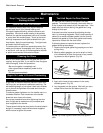
5. Test the gasket by closing the door on a slip of paper
as described above. Adjust the gasket in any areas
where an inadequate seal is evident.
All rope-type gasketing used in the Seneca is made of
fiberglass. The gasket size for the front, side and ash
doors, as well as for the top and inner top, is 3/8”
diameter. The front door glass is sealed with a 3/16”
gasket, while the flue collar employs a 1/4” size. Two
small pieces of 1/4” wire gaskets are used inside the
Seneca between the grate seals and the left side plate,
and a special Interam® gasket wraps around the
combustor to provide a seal.
Repair Missing Cement in Seams
The cement in the stove seams may deteriorate over
time and fall out in places. Just as with the stove
doors, it is necessary to keep the seam seals in good
condition. Spot-fix with furnace cement (available from
your local dealer) any areas where the cement seal is
visibly deteriorated. Allow 24 hours for the new
cement to dry after "washing down" seams.
Avoid Damaging the Glass Door Panel
Do not abuse the glass by slamming the door or striking
the glass with a log. Never operate your stove if it has
damaged or broken glass. If you need to replace the
glass, use only replacement glass provided by your local
Seneca dealer.
Replace Broken Glass Immediately
Prepare to replace the glass in your stove by first
clearing a large flat area nearby to use as a work
surface. Place in order the pieces that you disas-
semble. This will be a great help when you put the
pieces back together.
To remove the glass:
1. Open the front door. Lift the door gently while
raising the end nearest you slightly. This will cause
the bottom hinge pin to leave its seat. Once the
bottom hinge pin is free, lower the door to free the
top hinge pin. Place the door face down on a
padded surface.
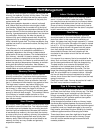
2. Remove the four #10 screws holding the stainless
steel glass retaining clips on the left and right sides
of the glass. Remove the clips, and lift the glass off
the brass frame. Lift broken glass carefully to avoid
being cut.
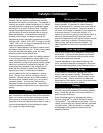
3. Remove the old gasket.
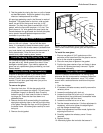
Door
Brass Frame
Gasket
Glass
Glass
Retaining
Clip
#10
Screws
ST745
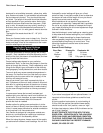
Fig. 31 In order of assembly, the front door glass compo-
nents include a brass frame, gasket, glass, two clips and four
screws.
To install the new glass:
1. Place a new piece of 3/16” gasket around the
perimeter of the brass frame for the glass to rest on,
as far to the outside as possible.
2. Place the new piece of glass on the gasket.
3. Position the glass retainer clips, and fasten in place
with the #10 screws previously removed. Tighten
the screws alternately.
Damper Adjustment
Check the damper to confirm that it is locking tightly
whenever the top is removed for combustor inspection.
If the damper needs adjustment, use a 7/16” socket
wrench with a socket extension and follow this proce-
dure:
1. Open the damper.
2. If necessary for better access, carefully remove the
refractory cover.
3. Loosen the adjusting bolt’s lock nut.
4. Loosen the anchor bolt’s lock nut (it is located on
the back side of the griddle and is accessible inside
the stove through the front door).
5. Loosen the anchor bolt a turn or two.
6. Test the damper mechanism. If further adjustment is
necessary, continue to tighten the adjusting bolt
until the damper closes snugly.
7. When final adjustment has been made, tighten the
adjusting bolt lock nut.
8. Carefully replace the refractory cover if it was
removed.
9. Replace the top.
10. Alternately tighten the two bolts that secure it.