


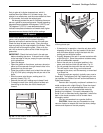


32
Vermont Castings Defiant
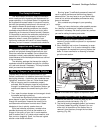
7. Press the gasketed part firmly against its normal
mating surface to seat the gasket evenly in its channel.
Close and latch the door to do this, or tap other parts
with the rubber mallet (or hammer/block of wood).
8. Clean any excess cement from around the channel,
then let the cement that holds the new gasket dry
thoroughly.
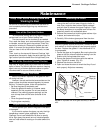
Adjust the Door Latch If Necessary
The stove’s doors may need adjustment after you have
regasketed them. Initially, it may require loosening the
latch to accommodate the new gasket; after a few
weeks, it may need tightening to compensate for
compression of the new gasket. The directions for
adjusting the latches are on page 28.
Permanent Defiant Gaskets
Other gaskets form seals between non-moving parts,
but these are not subject to the same wear and dete-
rioration as gaskets on moving parts. It is unlikely that
you will ever need to replace these gaskets unless the
involved parts are disassembled and then put back
together. If this is the case, the job should be done
only by a qualified service technician.
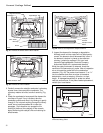
5/16" diameter gasket seals the following parts:
• The lower fireback to the back panel
• The left and right air plates (inner sides)
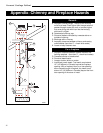
The Chimney System
Creosote
Your Defiant is designed to reduce creosote build-
up significantly. However, regular chimney inspection
and maintenance must still be performed. For safety,
good stove performance, and to protect your chimney
and chimney connector, inspect your chimney and
chimney connector on a regular schedule. Clean the
system if necessary. Failure to keep the chimney and
connector system clean can result in a serious chim-
ney fire.
When wood is burned slowly, it produces tar,
organic vapors and moisture that combine to form
creosote. The creosote vapors condense in the rela-
tively cool chimney flue of a slow-burning fire. As a
result, creosote residue accumulates on the flue lining.
When ignited, this creosote makes an extremely hot
fire within the flue system that can damage the chim-
ney and overheat adjacent combustible material. If a
significant layer of creosote has accumulated —1/8" (3
mm) or more — it should be removed to reduce the
risk of a chimney fire.
If you do experience a chimney fire, act promptly to:
• Close the damper and thermostat lever.
• Get everyone out of the house.
• Call the Fire Department.
Inspect the system every two weeks during the
heating season as part of a regular maintenance
schedule. To inspect the chimney, let the stove cool
completely. Then, using a mirror and a strong light,
sight up through the flue collar into the chimney flue. If
you cannot inspect the flue system in this fashion, the
stove must be disconnected to provide better viewing
access.
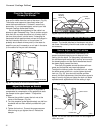
Clean the chimney using a brush the same size
and shape as the flue liner. Flexible fiberglass rods are
used to run the brush up and down the liner, causing
any deposits to fall to the bottom of the chimney where
they can be removed through the clean-out door.
Clean the chimney connector by disconnecting the
sections, taking them outside, and removing any
deposits with a stiff wire brush. Reinstall the connector
sections after cleaning, being sure to secure the joints
between individual sections with sheet metal screws.
If you cannot inspect or clean the chimney your-
self, contact your local Vermont CastingsMajestic
Products Company Dealer or a professional chimney
sweep.
Annual Maintenance
Every Spring, at the end of the heating season, per-
form a thorough cleaning, inspection and repair:
• Thoroughly clean the chimney and chimney connector.
• Inspect the chimney for damage and
deterioration.Replace weak sections of prefabricated
chimney. Have a mason make repairs to a masonry
chimney.
• Inspect the chimney connector and replace any
damaged sections.
• Check gasketing for wear or compression, and
replace if necessary.
• Inspect and clean the catalytic element. Lightly clean
the refractory assembly that houses the element but be
careful not to damage the refractory material, which is
very fragile.
• Clean the glass. Ash left on the glass can etch it,
resulting in a chalky appearance. Also check for
cracking; replace if needed.
• Check door and damper handles for tightness. Adjust
if needed.
• Check heat shield screws. Tighten as necessary.
• Clean dust from the inner sides of bottom, rear and
connector heat shields.
• Use a clean, dry, fine-bristle wire brush to remove any
built-up accumulation on the top of the griddle. It is
normal for the griddle to darken with use, and this is not
treatable.
• Remove ashes from the ash pan and replace with
moisture absorbing material (such as cat litter) to keep
the stove interior dry.
• Touch up the paint on black stoves.