


10
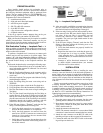
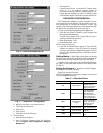
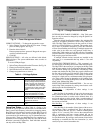
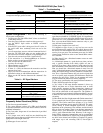
USER FUNCTIONS — To change the password as a user:
1. Select Change Password from the File menu. Change
password dialog appears. See Fig. 15.
2. Enter the desired criteria.
Enter user name and new password. Retype the new pass-
word in Confirm Password.
3. Click OK.
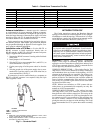
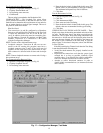
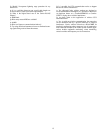
OEM FUNCTIONS — All units are delivered with default
OEM privileges. The system administrator must set units to
User access.
To access OEM privileges:
1. Select Change Password from the File menu. See Fig. 16.
2. Change password dialog appears.
3. Select the desired User name from the list.
4. Change user permissions as desired.
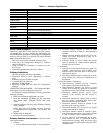
Table 4 — Privilege Options
Using Hop Tables —
A Hop Table is a listing of fre-
quencies in a given spectrum that are used for communication.
Data is sent to each frequency in the table in a hopping pattern.
Hop Tables provide improved security and the ability to avoid
localized noise sources. There are 101 possible Hop Tables in
your transceiver (this number may vary for international trans-
ceiver models). These are subdivided into five completely in-
dependent, non-overlapping Hop Table sets, each with no more
than three consecutive frequencies. Each individual network
can only utilize one Hop Table.
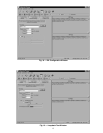
ENTERING HOP TABLE NUMBERS — Hop Table num-
bers can only be entered or changed by using the Quick Con-
figuration wizard.
Enter the desired identification numbers. See Assigning IDs
section for acceptable parameters. Select a Hop Table (0 to
100). The Hop Table selected must be the same for all trans-
ceivers in a Point-To-Point or a Network. This number speci-
fies a table of predefined frequencies, which the transceiver
will use for transmitting and receiving. If multiple separate net-
works exist in the same area, each network should have a
unique Hop Table number to avoid RF collisions. Depending
on which network is selected in the previous screen, certain ID
fields may be grayed and inaccessible.
If multiple isolated wireless networks are installed in the
same area, it is recommended that hop tables 1-5 be used
sequentually.
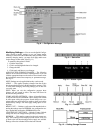
VALIDATING THE HOP TABLE — This command veri-
fies the integrity of the Hop Table stored within the transceiver.
The Hop Table in the transceiver is compared to the Hop Table
with the same number in the Configuration Manager database.
The Advanced Settings tab provides the selected Hop Table
number and whether the Hop Table has passed validation and
the first and last indices used for the Hop Table. Index values
are set to meet the requirements of the country in which the
transceiver is deployed for a minimum number of hop frequen-
cies. These values can not be changed to avoid violating coun-
try regulations. To validate the Hop Table, from the Commands
menu, select Validate Hop Table.
SPECIFYING HOPPING PARAMETERS — You can cus-
tomize Hop Table parameters by setting some features avail-
able from the Advanced Settings tab.
Max No Data
— (Adjustment of these settings is not
recommended.)
Max No Data is the number of hop cycles that must pass
during which no data was received and no data was available
for transmission before a session can be declared down. It is
used as the trigger to end a session. After a certain number of
Frames No Data between both units, the master will terminate
the current session/link.
Max Bad Hop
— (Adjustment of these settings is not
recommended.)
Max Bad Hop is the number of data frames with errors re-
ceived before a link is considered bad. This is the trigger to
stop the current link and wait for a random standoff period
(approx. 0.5 to 3 seconds). This is due to the assumption that
after 4 consecutive bad hops (system default but can be
changed), the link has been lost — either due to interference or
lost synchronization. By waiting a small amount of time before
attempting to reestablish the link, the obstruction (i.e., noise
source) may have moved somewhere else.
PRIVILEGE OPTIONS
User privileges
Assign privileges as OEM or User.
They can also be assigned Admin-
istrator privilege which provides the
ability to change user privileges. If
you are assigned as a User, you
can not add other users or change
the passwords of other users. Click
update for these changes to take
effect.
New
Add a new user by typing in their
name and password. You must
retype the password to confirm it.
Change password
Change the password of an exist-
ing user by typing in their name
and password. You must retype the
password to confirm it.
Remove users
Removes the currently selected
user.
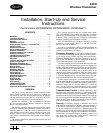
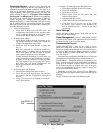
Fig. 14 — Power Management Window
Fig. 15 — Change Password Window