


Security Minimum Cool Set Point (Step 17)
If the Security Level is not set to 0, the minimum cooling set
point will be in effect. The user will not be allowed to set the
cooling set point below the specified value. The range of val-
ues is 35 to 99 F (1 to 37 C). The default is 65 F (18 C).
VI. INSTALL ACCESSORIES
The following accessories can be used with this thermostat:
• remote temperature sensor (TSTATBBPACC-WB)
• outdoor temperature sensor (TSTATBBPACC-01)
• Add-a-Wire™ accessory (TSTATBBPACC-AW)
Refer to the accessory installation instructions for each ac-
cessory for more information.
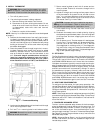
A. Remote Temperature Sensor
A remote temperature sensor may be provided to read the
temperature from a space. If a remote temperature sensor is
connected, the thermostat will ignore the reading of its in-
ternal sensor. When the thermostat is using a reading from a
remote sensor, the degree symbol above thetemperature read-
ing will blink.
VII. PROGRAM THERMOSTAT SCHEDULES
Before programming the thermostat, plan the thermostat daily
schedule. The schedule is divided into 7 days (Monday
through Sunday). Each day has from 2 to 4 time periods
(Occupied 1, Occupied 2, Occupied 3, Unoccupied) depending
on the configuration of the thermostat. Each occupied time
period has a start time, stop time, heating set point, and cool-
ing set point. The unoccupied time period has a heating set
point and a cooling set point. The unoccupied time period is
active when ever an occupied time period is not active. Fill in
Table 3 as an aid to programming the daily schedules.
NOTE: When the sensor detects light (the space is occupied),
the thermostat will enter Occupied 1 mode. If the room is
dark, the thermostat will follow its programmed schedule.The
Occupied 1 schedule should be turned OFF to keep the ther-
mostat from entering Occupied 1 while the room is unoccu-
pied. If the Occupied 1 schedule is turned ON, the thermo-
stat will enter Occupied 1 per the schedule regardless of light
activation. The Occupied 1 set points are used as the heating
and cooling set points during light activation. The Unoccu-
pied set points should be used as non-work hour set points
(before 8:00 AM and after 5:00 PM) when using light activa-
tion. For times when the building is unoccupied during work
hours (Monday through Friday, 8:00 AM to 5:00 PM), the Oc-
cupied 2 schedule should be turned ON, and can be used for
moderate energy savings with set points of 80 F for cooling
and 65 F for heating.
A. Programming Mode
To program the daily schedules, perform the following
procedure:
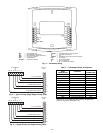
1. Enter programming mode by pressingthe Program but-
ton. The Occupied 1 annunciator will appear on the ther-
mostat display. Use the UP ARROW and DOWN AR-
ROW buttons to set the maximum number of Occupied
periods for each day. The thermostat can be set to 1, 2,
or 3. After the number of Occupied periods has been
selected, press the Mode button. See Fig. 5.
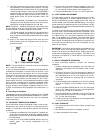
2. The cooling set point for Occupied 1 will be displayed.
Use the UP ARROW and DOWN ARROW buttons to
raise or lower the cooling set point until the desired
temperature is shown. The range of acceptable values
is 35 to 99 F (1 to 37 C). Press the Mode button to con-
tinue. See Fig. 5.
3. The heating set point for Occupied 1 will be displayed.
Use the UP ARROW and DOWN ARROW buttons to
raise or lower the heating set point until the desired
temperature is shown. The range of acceptable values
is 35 to 99 F (1 to 37 C). Press the Mode button to con-
tinue. See Fig. 5.
4. The cooling set point for Unoccupied will be displayed.
Use the UP ARROW and DOWN ARROW buttons to
raise or lower the cooling set point until the desired
temperature is shown. The range of acceptable values
is 35 to 99 F (1 to 37 C) or ‘‘OF’’ (no unoccupied cool-
ing). Press the Mode button to continue.
5. The heating set point for Unoccupied will be dis-
played. Use the UP ARROW and DOWN ARROW but-
tons to raise or lower the heating set point until the
desired temperature is shown. The range of acceptable
values is 35 to 99 F (1 to 37 C) or ‘‘OF’’ (no unoccupied
heating). Press the Mode button to continue.
6. The day of the week will be shown. Use the UP AR-
ROW and DOWN ARROW buttons to change the day
of the week until the desired starting day is shown.
Possible choices are M (Monday) through S (Sunday).
Press the Mode button when the desired day is shown.
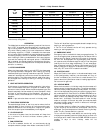
7. The Start Time for Occupied 1 will be displayed. Use
the UP ARROW and DOWN ARROW buttons to raise
or lower the time untilthe desired Start Time is shown.
Press the Mode button to continue. See Fig. 6.
8. The Stop Time for Occupied 1 will be displayed. Use
the UP ARROW and DOWN ARROW buttons to raise
or lower the time until the desired Stop Time is shown.
Press the Mode button to continue.
9. The On/Off icon will be displayed. Use the UPARROW
to turn the Occupied 1 period ON for this day. Use the
DOWN ARROW to turn the Occupied 1 period OFF for
this day.
10. Repeat Steps 2 through 9 to program the remaining
schedule for Occupied periods 2 and 3.
Fig. 5 — Setting Occupied 1 Set Points
Fig. 6 — Start Time Display
—5—