


3
7. An ESD service kit (available from commercial sources)
mayalsobeusedtopreventESDdamage.
CARE AND MAINTENANCE
For continuing high performance and to minimize possible
equipment failure, it is essential that maintenance be performed
annually on this equipment. Consult your local dealer about proper
maintenance and maintenance contract availability.
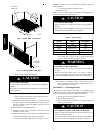
ELECTRICAL SHOCK HAZARD
Failure to follow this warning could result in personal injury
or death.
Turn off the gas and electrical supplies to the unit before
performing any maintenance or service. Lockout and tag with
appropriate label. Follow the operating instructions on the
label attached to the furnace.
!
WARNING
The minimum maintenance that should be performed on this
equipment is as follows:
1. Check and clean or replace air filter each month as needed.
2. Check blower motor and wheel for cleanliness annually.
3. Check electrical connections for tightness and controls for
proper operation each heating season. Service as necessary.
4. Check for proper condensate drainage. Clean as necessary.
5. Check for blockages in combustion-air and vent
pipes annually.
6. Check burners for cleanliness annually.
CUT HAZARD
Failure to follow this caution may result in personal injury.
Be careful of sharp metal edges, etc. Use care and wear
protective clothing, safety glasses, and gloves when
removing parts.
CAUTION
!
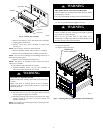
Procedure 1 — Cleaning and/or Replacing
Air Filter
The air filter arrangement may vary depending on the application
or orientation.
FIRE, CARBON MONOXIDE AND POISONING
HAZARD
Failure to follow this warning could result in property damage,
personal injury, or death.
Never operate unit without a filter or with the blower access
panel removed. Operating a unit without a filter or with the
blower access door removed could cause damage to the
furnace blower motor. Dust and lint on internal parts of
furnace can cause a l oss of efficiency.
!
WARNING
NOTE: I f filter has cross-mesh binding, binding must face blower.
If filter has an air direction arrow, arrow must point toward blower.
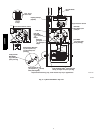
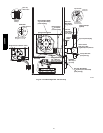
To clean or replace the filters, proceed as follows:
1. Turn off electrical supply to furnace.
2. Remove blower door.
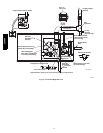
3. Slide filter out of furnace (See Fig. 2 and 3).
4. Furnaces are equipped with permanent, washable filter(s).
Clean filter by s praying cold tap water through filter in
opposite direction of airflow.
5. Rinse filter and let dry. Oiling or coating of filter is not
recommended.
6. Slide filter into furnace.
7. Replace blower door.
8. Turn on electrical supply to furnace.
Procedure 2 — Blower Motor and Wheel
Maintenance
To ensure long life, economy, and high efficiency, clean
accumulated dirt and grease from blower wheel and
motor annually.
The inducer and blower motors are pre-lubricated and require no
additional lubrication. These motors can be identified by the
absence of oil ports on each end of the motor .
The following items should be performed by a qualified service
technician.
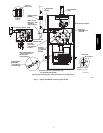
Clean blower motor and wheel as follows:
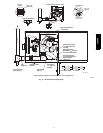
1. Turn off electrical supply to furnace.
2. Remove blower door.
3. Disconnect blower motor wires from furnace control board.
Field thermostat connections may need to be disconnected
depending on their length and routing.
4. Remove control box mounting screws, and position control
box, transformer, and door switch assembly to right side of
furnace casing.
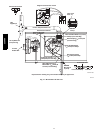
5. If condensate trap is located in left-or right-hand side of
furnace casing, proceed to item 6, otherwise remove trap
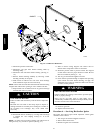
and tubing as described below. (See top Fig. 6, 7, or 8.)
a. Disconnect field drain connection from condensate trap.
b. Disconnect drain and relief port tubes from
condensate trap.
c. Remove condensate trap from blower shelf.
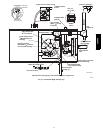
6. Remove screws securing blower assembly to blower shelf
and slide blower assembly out of furnace.
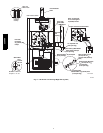
7. Clean blower wheel and motor by using a vacuum with soft
brush attachment. Be careful not to disturb balance weights
(clips) on blower wheel vanes. Do not bend wheel or blades
as balance will be affected.
8. If greasy residue is present on blower wheel, remove wheel
from the blower housing and wash it with an appropriate
degreaser . To remove wheel:
a. Mark blower wheel location on shaft before disassembly
to ensure proper reassembly.
b. Loosen setscrew holding blower wheel on motor shaft.
NOTE: Mark blower mounting arms and blower housing so each
arm is positioned at the same hole location during reassembly.
c. Mark blower wheel orientation and cutof f plate location
to ensure proper reassembly.
d. Remove screws securing cutoff plate and remove cutoff
plate from housing.
e. Remove bolts holding motor mounts to blower housing
and slide motor and mounts out of housing. Disconnect
capacitor and ground wire attached to blower housing
before removing motor. Motor mounts need not be
removed from motor.
359AAV