


4. ASSEMBLY
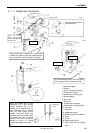
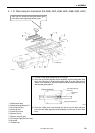
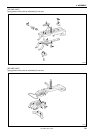
4-16. Work clamp arm mechanism (KE-432B, 432C)
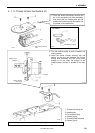
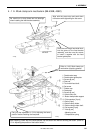
Align with the screw stop and push down
from above while tightening the set screw.
KE-430B, 430C series
90
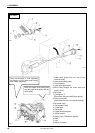
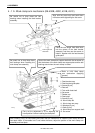
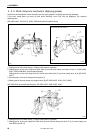
After installing, carry out test feeding and check that the needle hole is inside the work clamp and the
feed plate frame. If the needle hole is not inside the frame, adjust the position of the button clamp holder
support and feed plate.
3428Q
3426Q
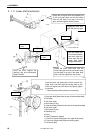
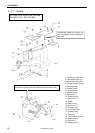
Be careful not to drop these two ball
bearings when installing the feed bracket
assembly.
Place the tack length feed slide
block into the groove of the feed
bracket assembly, and then use
the screws to install it together
with the feed bracket guide plate.
Tack length feed
slide block
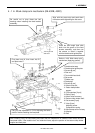
Refer to “4-20. Work clamp arm
mechanism (Applying grease)”
First place onto A, then insert into B
an
d place onto C.
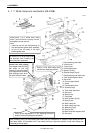
1. Fee
d bracket assy
2. Feed bracket guide plate
3. Screws [8 pcs]
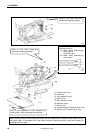
4. Rod end
5. Tack width feed shaft
6. Set screw
7. Rubber cap
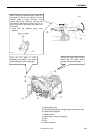
8. Feed plate
9. Screws [2 pcs]
10. Work clamp felt
11. Button clamp holder
support
12. Plain washers [2 pcs]
13. Bolts [2 pcs]
14. Work clamp arm assy
15. Button clamp holder shaft
16. Set screws [2 pcs]
17. Nuts [2 pcs]
Adjusting screw
Co
mpression spring
18. Work clamp carrier rod assy
Carry out the adjustment in “5-24. Adjusting the home
position” before installing the feed plate.
19. Washer
20. Bolt