


The Mounting Bracket:
T
o r
emove the mounting bracket fr
om the Alarm
base, hold the Alarm base firmly and twist the
mounting bracket counterclockwise. The mounting
bracket installs onto the junction box. It has a
variety of screw slots to fit most boxes.
The Power Connector:
The power connector plugs into a power input block
on the Alarm. It supplies the unit with AC power.
• The black wire is “hot.”
• The white wire is neutral.
• The orange wire is used for interconnect.
If you need to r
emove the power connector
, tur
n
POWER OFF first. Insert a flat screwdriver blade
between the power connector and the security tab
inside the power input block. Gently pry back the tab
and pull the connector free.
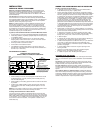
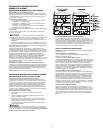
The Parts of This Unit
1
Mounting Bracket
2 Mounting Slots
3
Locking Pins (br
eak out of
bracket)
4 Hot (Black) AC Wire
5 Neutral (White) AC Wire
6
Interconnect (Orange) Wire
7 Quick-Connect Power
Connector
8 Turn this way to remove
fr
om bracket
9 Turn this way to attach to
bracket
10 Slide-Out Battery Drawer
HOW TO INSTALL THIS SMOKE/CO ALARM
THE PARTS OF THIS ALARM
This Smoke/CO Alarm is designed to be mounted on any standard wiring junction box up to a 4-inch (10 cm) size, on either the ceiling or wall (if allowed
by local codes). Read “Where to Install This Alarm” and “Where This Alarm Should Not Be Installed” before you begin installation.
Tools you will need: • Needle-nose pliers or utility knife • Standard flathead screwdriver • Wire strippers.
Make sure the Alarm is not receiving excessively noisy power
. Examples of noisy power could be major appliances on the same circuit, power
from a generator or solar power, light dimmer on the same circuit or mounted near fluorescent lighting. Excessively noisy power may cause
damage to your Alarm.
3
WEEKLY TESTING
•
N
EVER use an open flame of any kind to test this unit. You
m
ight accidentally damage or set fire to the unit or to your
h
ome. The built-in test switch accurately tests the unit’s
o
peration as required by Underwriters Laboratories, Inc. (UL).
N
EVER use vehicle exhaust! Exhaust may cause permanent
damage and voids your warranty.
• If the Alarm ever fails to test properly, replace it immediately.
Products under warranty may be returned to the manufacturer
f
or replacement. See “Limited Warranty” at the end of this
manual.
I
t is important to test this unit every week to make
sure it is working properly. Using the test button is
t
he recommended way to test this Smoke/CO Alarm.
Y
ou can test this Smoke/CO Alarm by
p
ressing and
holding the Test/Silence button on the Alarm cover until
A
larm
V
oice
s
ays “Testing” (typically 3-5 seconds).
D
uring testing, you will see and hear the following sequence:
•
The Alarm
V
oice
w
ill say “Testing.” The
H
orn
w
ill sound 3 beeps,
p
ause, 3 beeps. The Alarm
V
oice
w
ill say “Warning, evacuate
smoke in [Location, example: “Basement”]. Evacuate.” The
P
ower/Smoke LED
f
lashes Red and the
C
O LED
w
ill be Off.
•
N
ext the
H
orn
w
ill sound 4 beeps, pause, 4 beeps. The Alarm
Voice will say “Warning, evacuate carbon monoxide in [Location,
example: “Basement”]. Evacuate.” The
Power/Smoke LED will
b
e Off and the
C
O LED
f
lashes Red.
I
f the unit does not alarm, make sure the batteries are correctly
installed, and test again. If the unit still does not alar
m
, replace it
immediately.
2
1
REGULAR MAINTENANCE
U
se only the replacement batteries listed below. The unit may not
o
perate properly with other batteries. Never use rechargeable
b
atteries since they may not provide a constant charge.
This unit has been designed to be as maintenance-free as possible, but
t
here are a few simple things you must do to keep it working properly:
• Test it at least once a week.
• Clean the Smoke/CO Alarm at least once a month; gently vacuum
the outside of the Smoke/CO Alarm using your household vacuum’s
s
oft brush attachment. Test the Smoke/CO Alarm. Never use water,
c
leaners or solvents since they may damage the unit.
•
If the Smoke/CO Alarm becomes contaminated by excessive dirt,
dust and/or grime, and cannot be cleaned to avoid unwanted
a
larms, replace the unit immediately.
• Relocate the unit if it sounds frequent unwanted alarms. See
“
Where This Alarm Should Not Be Installed” for details.
•
When the battery back-up becomes weak, the Alarm will “chirp”
a
bout once a minute (the low battery warning), and the
V
oice
w
ill
say “Replace battery in [Location, example “Basement”].” Repeated
e
very 5 hours. This warning should last 7 days, but you should
r
eplace the battery immediately to continue your protection.
The Low Battery Latch feature will be engaged. The Green
P
ower/Smoke LED will flash On for 2 seconds/Off for 2 seconds.
Choosing a replacement battery:
Y
our Smoke/CO Alarm requires two “AA” Energizer E91 batteries.
These batteries are available at many local retail stores.
A
ctual battery service life depends on the Alarm and the environment
in which it is installed. All the batteries specified above are acceptable
replacement batteries for this unit. Regardless of the manufacturer’s
s
uggested battery life,
y
ou MUST replace the battery immediately
once the unit starts “chirping” (the “low battery warning”).
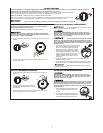
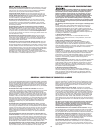
To replace the batteries (without removing Alarm from the ceiling
or wall):
1
. Open the battery compartment.
2. Press tabs A and B as shown in the
diagram and remove each battery.
3. Insert the new batteries, making sure
they snap completely into the battery
compartment. Match the terminals on
the ends of the batteries with the
terminals on the unit.
4. Close the battery compartment, and
then test the unit by pressing the
Test/Silence button.
A
B