


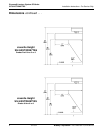

Express® Lavatory System SS-Series
Installation Instructions - For Service Only SS-3/AST/WH97TAS
19
Bradley Corporation • 215-1240 Rev. D; EN 03-813 5/11/04
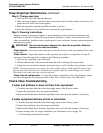
THEN
Valve Position is Hot Supply Cold Supply Valve Delivers
Correct Hot Cold Mixed 107°
Correct Hot No Water Valve shuts off or drips
Correct No Water Cold Valve shuts off or drips
Correct Hot Hot Hot
Correct Cold Cold Cold
Reversed Hot Cold Cold/below 107° Hot/above 107°
Reversed Hot No Water Hot
Reversed No Water Cold Cold
Reversed Hot Hot Hot
Reversed Cold Cold Cold
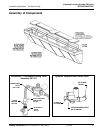
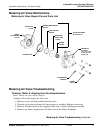
Vernatherm™ Mixing Valve Maintenance and Service
*Repair kit S45-049 is pre-packaged and includes O-Ring, Flip Ring, Power Element and Spring.
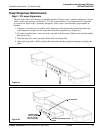
Maintenance Instructions
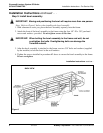
1. Disassemble the Vernatherm™ Valve as shown,
being careful not to damage the power element.
Replace the element, if necessary.
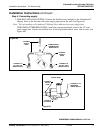
2. If necessary, remove the old flip ring and replace
with a new ring.
NOTE: An old or worn flip ring may cause temperature
fluctuation and/or water chatter.
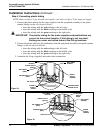
3. Reassemble the power element and valve body.
Apply grease to the main valve slide and gently
ease into position, rotating so that grease is
applied to the flip ring. Do not force the slide as
this may push the flip ring from its position. To
test, rotate the slide; a slight drag should be felt
when correctly installed.
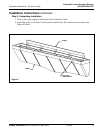
4. Reassemble the valve.
Service Suggestions
When servicing the valve, make sure it is installed in the correct position. The most common error
occurs when the valve is installed in the reversed position, that is, the hot line is connected to the
cold line and the cold is connected to the hot.
NOTE: A red marking indicates the hot side of the valve.
The table below lists conditions that occur when the valve is installed correctly, and when it is in
the reversed position.
Flip Ring*
125-015
Power Element*
S27-019
Valve Slide
S01-039
Spring*
135-008
O-Ring*
125-001CH
Screw
160-175
Body
S73-027
Body (chrome)
S73-028
Cover
107-261B
IF