


22
SECTION VIII
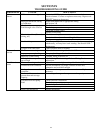
MAINTENANCE
This solar water heater is intended to provide a service life of many years. Components that require service,
however, may be subject to failure. Failure to use the correct procedures or parts in these circumstances may make
the water heater unsafe.
The owner should arrange to have the following inspections and simple maintenance procedure performed by
qualified service personnel at the frequencies suggested.
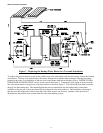
1. Solar and Domestic Water Piping (Annual) - Check all piping for signs of leakage at joints, unions, and shut-
off valves. Repair as needed.
2. Temperature-Pressure Relief Valve (Annual) - The temperature-pressure relief valve should be checked to
ensure that it is in operating condition. To check the relief valve, lift the lever at the end of the valve several
times. The valve should seat properly and operate freely. If water does not flow, remove and inspect for
obstructions or corrosion. Replace with a new valve of the recommended capacity as necessary. Do not attempt
to repair the valve, as this could result in improper operation and a tank explosion. In areas with poor water
conditions, it may be necessary to inspect the temperature-pressure relief valve more often than once a year.
If the temperature–pressure relief valve on the heater discharges periodically or continuously, it may be due to
thermal expansion of water in a closed water supply system, or it may be due to a faulty relief valve.
Thermal expansion is the normal response of water when it is heated. In a closed system, thermal expansion will
cause the system pressure to build until the relief valve actuation pressure is equaled. Then the relief
valve will open, allowing some water to escape, slightly lowering the pressure. Contact your water supplier or local
plumbing inspector on how to control this situation.
ABOVE ALL, DO NOT PLUG THE TEMPERATURE AND PRESSURE RELIEF VALVE. THIS IS NOT A
SOLUTION AND CAN CREATE A HAZARDOUS SITUATION.
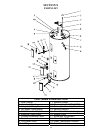
3. Anode Inspection and Replacement - This water heater is equipped with multiple sacrificial anodes. Anodes
protect the glass-lined tank from corrosion by sacrificing themselves through electrolysis. When the anode
material is consumed, there is no more protection and corrosion of the tank accelerates.
Inspection of the anodes every year allows you to identify spent anodes and replace. Replace the anodes when
its diameter is 3/8 of an inch, or every other year, which ever is first. Aggressive, very hot and softened water
causes rapid consumption of the anode, requiring frequent inspections. Anodes are available from your
distributor or from the manufacturer.
To inspect or replace an anode:
The anodes on this water heater are easily accessible from the top of the heater making replacement simple and
quick.
a. Turn the water heater and, if applicable, solar controller electricity off. Flow water until the discharge is cool
or allow enough time for the potable water to cool naturally. Connect a hose to the drain valve. Locate the
hose’s discharge in an area where any remaining hot water will not cause any damage or injury.
b. Open the drain valve to flush any sediment out of the bottom to the heater.
c. Shut off the cold water supply. Make sure all hot water fixtures and circulating pumps are turned off.
d. Wait for water flow from the hose to stop. Remove the anode using a socket of the appropriate size. Do not
use an impact wrench.
e. Inspect and replace the anode as required. Use pipe tape or sealant when reinstalling the anode.
f. Close the drain valve. Open a hot water fixture to allow air to escape. Open the cold water supply to the
heater and allow the tank to fill.
g. Check your anode and drain valve for leaks.
h. Turn the water heater and, if applicable, solar controller electricity on.
CAUTION
Before manually operating the valve, make sure that a drain line has been attached to the valve to direct the
discharge to an open drain. Failure to take this precaution could mean contact with extremely hot water
discharging from the valve during this checking operation.